GP3 weather (en): Unterschied zwischen den Versionen
| Zeile 31: | Zeile 31: | ||
Back to [[#top | table of contents]] | Back to [[#top | table of contents]] | ||
| − | == | + | == Configure Weather Plugin == |
{| | {| | ||
|[[Bild:GP3 Wetter Menü.png|thumb|none|Menü Taste - Skin Beispiel: gp-skin-zombi.hd1r3|420px]] | |[[Bild:GP3 Wetter Menü.png|thumb|none|Menü Taste - Skin Beispiel: gp-skin-zombi.hd1r3|420px]] | ||
| Zeile 37: | Zeile 37: | ||
|} | |} | ||
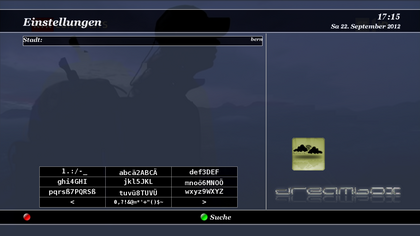
| − | + | Use the '''[Menü]''' button after starting the plugin to configure the weather forecast. The following list explains the possibilities. | |
{| border=1 style="text-align:center; margin:1em 1em 1em 0; background:#D0D0D0; border:1px #000000 solid; border-collapse:collapse; empty-cells:show;" CELLPADDING=2 CELLSPACING=0" | {| border=1 style="text-align:center; margin:1em 1em 1em 0; background:#D0D0D0; border:1px #000000 solid; border-collapse:collapse; empty-cells:show;" CELLPADDING=2 CELLSPACING=0" | ||
| − | | width="180px" | ''' | + | | width="180px" | '''Option''' |
| − | | width="700px" | ''' | + | | width="700px" | '''Description''' |
|- style="text-align:center; margin:1em 1em 1em 0; background:#FFFFFF" | |- style="text-align:center; margin:1em 1em 1em 0; background:#FFFFFF" | ||
| − | | width="70px" | ''' | + | | width="70px" | '''Add City''' |
| − | | width="600px" | | + | | width="600px" | after pressing the '''[OK]''' button you can enter a city and push the '''[green]''' button. |
|- style="text-align:center; margin:1em 1em 1em 0; background:#FFFFFF" | |- style="text-align:center; margin:1em 1em 1em 0; background:#FFFFFF" | ||
| − | | width="70px" | ''' | + | | width="70px" | '''Unit in Celsius''' |
| − | | width="600px" | | + | | width="600px" | Define temperature unit, Celsius ('''Yes''') or Fahrenheit ('''No'''). |
|- style="text-align:center; margin:1em 1em 1em 0; background:#FFFFFF" | |- style="text-align:center; margin:1em 1em 1em 0; background:#FFFFFF" | ||
| − | | width="70px" | '''Plugin | + | | width="70px" | '''Use Plugin Icons''' |
| − | | width="600px" | | + | | width="600px" | When selecting '''[No]''' the standard msn icons are displayed and stored in the Gemini Cache directory. The choice '''[Yes]''' shows the Weahter Icons from [http://iconbest.com/ iconbest.com]. |
|} | |} | ||
| Zeile 58: | Zeile 58: | ||
|} | |} | ||
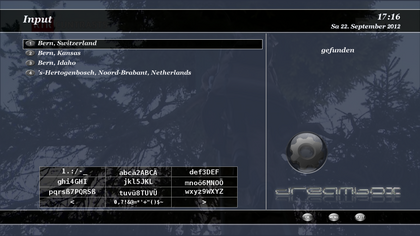
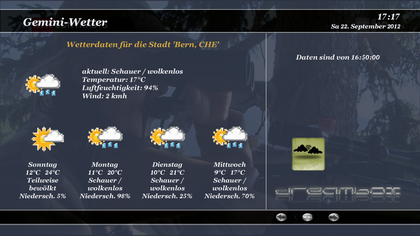
| − | + | Depending on the entered data you will get a list of cities. Choose the desired city and press the '''[OK]''' button. The weather forecast will be shown. | |
Version vom 23. September 2012, 22:12 Uhr
InhaltsverzeichnisThe geminiweather Plugin shows the weather forecast, based on the data of msn. Bedides the weather data of the actual daythe forecast of the following four days are displayed. It's possible to see the forecast of different configured cities. Also using alternative Weather Icons is possible. Weather PluginInstallationInstall the Weather Plugin (geminiweather) via [Addons] in the BluePanel. After a Enigma2 restart, you find the Weather Plugin in the BluePanel. It's also possible to install the plugin over the command line: opkg update && opkg install geminiweather
Configure Weather PluginUse the [Menü] button after starting the plugin to configure the weather forecast. The following list explains the possibilities.
Depending on the entered data you will get a list of cities. Choose the desired city and press the [OK] button. The weather forecast will be shown.
Einrichten von mehreren StädtenWeitere Städte könnt ihr auch hinzufügen. Benutzt wieder die [Menü] Taste und fügt eine neu Stadt hinzu, wie im vorhergehenden Abschnitt beschrieben. Die Wettervorhersage der einzelnen Städte, könnt ihr mit der links, rechts Taste der Fernbedienung auswählen. Die folgende Tabelle, zeigt die neuen Einstellmöglichkeiten.
Plugin Icons aktivierenIm Wetter Plugin befindet sich ein alternatives Icon Paket zu den msn Bildern. Dieses könnt ihr aktivieren, wenn ihr via [Menü] Taste die [Plugin-Icons benutzen] auf ja stellt.
SensorfelderBei einem GP3 Skins, könnt ihr Wetterinformationen in der Infobar anzeigen lassen. Dazu müsst ihr die Sensorfelder im BluePanel => Einstellungen anpassen. Folgende Einstellungen sind möglich.
Andere Wetter IconsWenn ihr andere Wetter Icons benutzen wollt, müsst ihr sie im Gemini-Cache in den Ordner weather kopieren. Der GP3-Cache befindet sich in folgendem Verzeichnis: /home/root/.geminicache Die Bilder müssen im gif Format sein. 8 bit png's werden auch unterstützt. Die Dateiendung muss aber in gif umbenannt werden, damit sie dargestellt werden. Anschliessend müsst ihr noch die Einstellung [Plugin-Icons] auf nein ändern. Beispiele von verschiedenen Wetter Icons, sind in den folgenden Bildern ersichtlich. Back to overview: Gemini-Wiki:English Portal or Mainpage |


