GP3 weather (en): Unterschied zwischen den Versionen
Mfgeg (Diskussion | Beiträge) K (Index angepasst) |
Mfgeg (Diskussion | Beiträge) K (typos) |
||
| Zeile 15: | Zeile 15: | ||
__TOC__ | __TOC__ | ||
| − | The '''geminiweather''' Plugin shows the weather forecast, based on the data of [http://weather.msn.com/ msn]. | + | The '''geminiweather''' Plugin shows the weather forecast, based on the data of [http://weather.msn.com/ msn]. Besides the weather data of the actual day the forecast of the following four days are displayed. |
It's possible to see the forecast of different configured cities. | It's possible to see the forecast of different configured cities. | ||
| Zeile 35: | Zeile 35: | ||
== Configure Weather Plugin == | == Configure Weather Plugin == | ||
{| | {| | ||
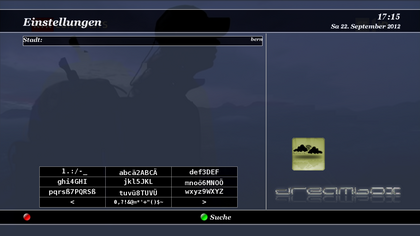
| − | |[[Bild:GP3 Wetter Menü.png|thumb|none| | + | |[[Bild:GP3 Wetter Menü.png|thumb|none|Menu key - Skin example: gp-skin-zombi.hd1r3|420px]] |
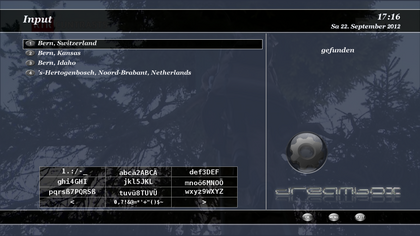
| − | |[[Bild:GP3 Wetter Bern.png|thumb|none| | + | |[[Bild:GP3 Wetter Bern.png|thumb|none|Enter desired city (e.g. Bern)|420px]] |
|} | |} | ||
| Zeile 52: | Zeile 52: | ||
|- style="text-align:center; margin:1em 1em 1em 0; background:#FFFFFF" | |- style="text-align:center; margin:1em 1em 1em 0; background:#FFFFFF" | ||
| width="70px" | '''Use Plugin Icons''' | | width="70px" | '''Use Plugin Icons''' | ||
| − | | width="600px" | When selecting '''[No]''' the standard msn icons are displayed and stored in the Gemini Cache directory. The choice '''[Yes]''' shows the | + | | width="600px" | When selecting '''[No]''' the standard msn icons are displayed and stored in the Gemini Cache directory. The choice '''[Yes]''' shows the Weather Icons from [http://iconbest.com/ iconbest.com]. |
|} | |} | ||
{| | {| | ||
| − | |[[Bild:GP3 Wetter Auswahl.png|thumb|none| | + | |[[Bild:GP3 Wetter Auswahl.png|thumb|none|Select City|420px]] |
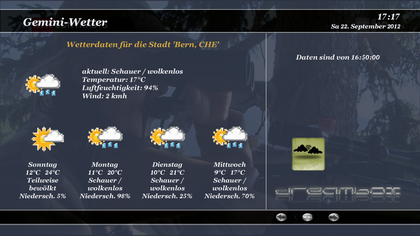
| − | |[[Bild:GP3 Wetter Anzeige Bern.png|thumb|none| | + | |[[Bild:GP3 Wetter Anzeige Bern.png|thumb|none|Display of msn icons|420px]] |
|} | |} | ||
| Zeile 67: | Zeile 67: | ||
== Configure multiple cities == | == Configure multiple cities == | ||
| − | [[Bild:GP3 Wetter Neue Stadt hinzufügen.png|thumb|none| | + | [[Bild:GP3 Wetter Neue Stadt hinzufügen.png|thumb|none|Multiple Weather informations|420px]] |
| − | Additional cities can be added. Use the '''[Menu]''' button again and add an new city as described in the previous | + | Additional cities can be added. Use the '''[Menu]''' button again and add an new city as described in the previous chapter. The weather forecasts of the different cities can be selected with the '''left, right''' button of the remote. The following list shows the new settings. |
{| border=1 style="text-align:center; margin:1em 1em 1em 0; background:#D0D0D0; border:1px #000000 solid; border-collapse:collapse; empty-cells:show;" CELLPADDING=2 CELLSPACING=0" | {| border=1 style="text-align:center; margin:1em 1em 1em 0; background:#D0D0D0; border:1px #000000 solid; border-collapse:collapse; empty-cells:show;" CELLPADDING=2 CELLSPACING=0" | ||
| Zeile 90: | Zeile 90: | ||
== Activate Plugin Icons == | == Activate Plugin Icons == | ||
| − | [[Bild:GP3 Wetter Plugin Icons.png|thumb|none|Alternative | + | [[Bild:GP3 Wetter Plugin Icons.png|thumb|none|Alternative Weather icons|420px]] |
In the Weather Plugin a package with alternative icons for the msn images is included. These can be activated with '''[Menu]''' and '''[Use Plugin Icons]''' set on '''Yes'''. | In the Weather Plugin a package with alternative icons for the msn images is included. These can be activated with '''[Menu]''' and '''[Use Plugin Icons]''' set on '''Yes'''. | ||
| Zeile 99: | Zeile 99: | ||
== Sensor fields == | == Sensor fields == | ||
| − | [[Bild:GP3 Wetter Sensorfelder.png|thumb|none|Infobar - | + | [[Bild:GP3 Wetter Sensorfelder.png|thumb|none|Infobar - Display of temperature|800px]] |
With a GP3 Skins, it's possible to show weather information in the infobar. Change the sensor field settings in the BluePanel => Settings. Following settings are possible: | With a GP3 Skins, it's possible to show weather information in the infobar. Change the sensor field settings in the BluePanel => Settings. Following settings are possible: | ||
| Zeile 117: | Zeile 117: | ||
/home/root/.geminicache | /home/root/.geminicache | ||
| − | The images should be saves as [http://en.wikipedia.org/wiki/Graphics_Interchange_Format gifs]. 8 bit png's are also supported. but the | + | The images should be saves as [http://en.wikipedia.org/wiki/Graphics_Interchange_Format gifs]. 8 bit png's are also supported. but the extension '''must''' be changed in gif to be displayed. Also make sure the setting '''[Use Plugin Icons]''' is set to '''No'''. |
Examples of different weather icons: | Examples of different weather icons: | ||
Version vom 23. September 2012, 23:07 Uhr
InhaltsverzeichnisThe geminiweather Plugin shows the weather forecast, based on the data of msn. Besides the weather data of the actual day the forecast of the following four days are displayed. It's possible to see the forecast of different configured cities. Also using alternative Weather Icons is possible.
Weather PluginInstallationInstall the Weather Plugin (geminiweather) via [Addons] in the BluePanel. After a Enigma2 restart, you find the Weather Plugin in the BluePanel. It's also possible to install the plugin over the command line: opkg update && opkg install geminiweather
Configure Weather PluginUse the [Menü] button after starting the plugin to configure the weather forecast. The following list explains the possibilities.
Depending on the entered data you will get a list of cities. Choose the desired city and press the [OK] button. The weather forecast will be shown.
Configure multiple citiesAdditional cities can be added. Use the [Menu] button again and add an new city as described in the previous chapter. The weather forecasts of the different cities can be selected with the left, right button of the remote. The following list shows the new settings.
Activate Plugin IconsIn the Weather Plugin a package with alternative icons for the msn images is included. These can be activated with [Menu] and [Use Plugin Icons] set on Yes.
Sensor fieldsWith a GP3 Skins, it's possible to show weather information in the infobar. Change the sensor field settings in the BluePanel => Settings. Following settings are possible:
Other Weather IconsIf you want, you can use other weather icons. Copy the icons in the Gemini Cache in the directory weather. The GP3 Cache can be found in the following directory: /home/root/.geminicache The images should be saves as gifs. 8 bit png's are also supported. but the extension must be changed in gif to be displayed. Also make sure the setting [Use Plugin Icons] is set to No. Examples of different weather icons: Back to overview: Gemini-Wiki:English Portal or Mainpage |


