Dumbo (en): Unterschied zwischen den Versionen
Tasman (Diskussion | Beiträge) (Übersetzung angepasst) |
Tasman (Diskussion | Beiträge) |
||
| Zeile 180: | Zeile 180: | ||
{{Hinweis|'''Partition Label'''<br/>After the partition the FAT filessystem is labeled '''Timothy''' and the ext3 filesystem is labled '''Dumbo'''.}} | {{Hinweis|'''Partition Label'''<br/>After the partition the FAT filessystem is labeled '''Timothy''' and the ext3 filesystem is labled '''Dumbo'''.}} | ||
| + | |||
| + | |||
| + | Back to [[#top | table of contents]] | ||
| + | |||
| + | = Using the Dumbo Plugin = | ||
| + | [[Bild:Dumbo Plugin Menu.png|thumb|Dumbo Menu|300px]] | ||
| + | The functions of Dumbo depends of using the Flashimage or the Dumbo-device.<br/> | ||
| + | Please read the following chapters to learn the main functions. | ||
| + | |||
| + | This two functions are the same in Flashimage or Dumbo-device. | ||
| + | |||
| + | *'''[Back]''' - Close the Dumbo Plugin | ||
| + | *'''[Donation]''' - Shows the donation information on the TV | ||
| + | |||
| + | |||
| + | == Start via Flashimage == | ||
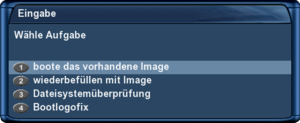
| + | [[Bild:Dumbo Plugin Flash Auswahl.png|thumb|Button [Boot]|300px]] | ||
| + | |||
| + | You can call three functions by pressing the yellow button at your remote control called '''[Boot]'''.<br/> | ||
| + | The screenshot on the right shows the posibilities. | ||
| + | |||
| + | |||
| + | *'''[Start available image]''' - Starts the image from the Dumbodevice | ||
| + | *'''[refill with image]''' - Starts partitioning and choosing the image to decompress at the Dumbodevice. | ||
| + | *'''[Verify filesystem]''' - Verifies the Dumbodevice about FAT or ext3 filesystem errors | ||
| + | |||
| + | |||
| + | You cannot use the green button '''[Save]''' while the flash image is still in use and active. | ||
Back to [[#top | table of contents]] | Back to [[#top | table of contents]] | ||
Version vom 23. März 2011, 20:03 Uhr
This translation is currently under construction!
To read the complete article please refere to the German version at:
→ Dumbo - das dumme Boot Plugin
InhaltsverzeichnisDo you have less flash-memory at your Dreambox for your daily Updates, Skins or Picons? Than Dumbo may be interesting for you. This plugin helps you to boot the Dreambox via a compressed image from a removable media like Compact Flash or USB-Stick. Dumbo is not a tool for Multiboot but it supports to boot via removable drives. Of course you can backup this kind of image. This plugin also helps to create a swap-file (/media/swap/swapfile) at a size of 200MB. Because of this you can use Dumbo at Dreamboxes with less RAM (like the DM 7025) without having problems due to less memory while decompressing or maintaining the image. The swap-file is activated during the boot process of Dumbo as told in the /etc/fstab. You configure Dumbo in this steps. Install the plugin into the flash image (the main image in the Dreambox). Than plug in the Compact Flash card or your prefered media to create partitions on it. You will get two partitions. The first to create a bootable FAT file system and the second to create the main ext3 file system. Now start the plugin Dumbo to choose the image that will be installed at your removable media. After about 5 minutes of decompression, installing and rebooting the Dreambox will be available for your new experiments. The complete configuration of the Dumbo-Plugin is described in this article. Please take your time to read it carefully to get all requirements. Good luck and have a lot of fun! :-) This article is based at the forum-topic: Dumbo - the Dumb Boot Plugin (German language)
Objectives:
Requirements:
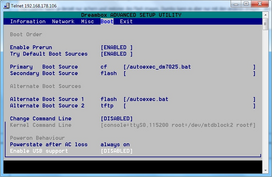
Installing Dumbo the dumb boot pluginBios-Configuration of the DreamboxYou need to prepare the Bios to be able to boot via a removable media containing the FAT filesystem. You need to activate USB Support at all Dreamboxes. But you do not need to activate this at the 7025.
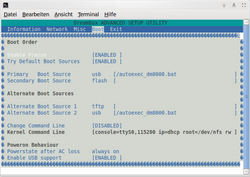
DM 500 HDPrimary boot source: usb [/autoexec_dm500.bat] Secondary boot source: flash
DM 7025 (+)Primary boot source: cf [/autoexec_dm7025.bat] Secondary boot source: flash
DM 800HD PVR und DM 800HD sePrimary boot source: usb [/autoexec_dm800.bat] Secondary boot source: flash
DM 8000HD PVRPrimary boot source: usb [/autoexec_dm8000.bat] Secondary boot source: flash
Dumbo plugin installationFor the installation both files from the Dumbo thread are needed.
Dosfstools is used to create the FAT partition. The second packet is the actual Dumbo plugin. Copy dosfstools and Dumbo plugin via FTP to the Dreambox into the /tmp folder. opkg install /tmp/*.ipk
opkg install /tmp/dosfstools_3.0.11* Followed by the next command, that installs the Dumbo plugin. opkg install /tmp/enigma2-plugin-extensions-dumbo*
Prepare desired image for the Dumbo deviceNow copy the desired image for the CF card or USB-Stick to the Dreambox.
Start Dumbo Plugin, partition it and decompress itStart the Dumbo Plugin via the Extenstions and press the yellow Buttun called [Boot] at your remote control. To configure you need to execute the following steps. The GIF animation on the right side shows the steps as screenshots.
Than restart the Dreambox. The new images should be started and it should be ready to use.
Using the Dumbo PluginThe functions of Dumbo depends of using the Flashimage or the Dumbo-device. This two functions are the same in Flashimage or Dumbo-device.
Start via FlashimageYou can call three functions by pressing the yellow button at your remote control called [Boot].
|


