InputDeviceSelection im Skin erstellen
Zur Navigation springen
Zur Suche springen
| An diesem Artikel wird derzeit gearbeitet. Achtung: Der Artikel kann unvollständig und fehlerhaft sein! |
Inhaltsverzeichnis
Einleitung
Der Screen name="InputDeviceSelection" ist wie folgt zu finden:
- Menü -> Einstellungen -> System -> "Eingabegeräte"
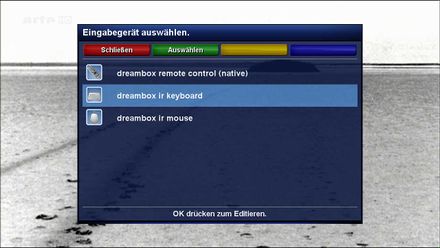
InputDeviceSelection im Defaultskin
Im OE 2.0 Default-HD skin ist dieser Abschnitt so dargestellt:
	<!-- Input Device -->
	<screen name="InputDeviceSelection" position="center,120" size="820,520" title="Select input device">
		<ePixmap pixmap="Default-HD/buttons/red.png" position="10,5" size="200,40" alphatest="on"/>
		<ePixmap pixmap="Default-HD/buttons/green.png" position="210,5" size="200,40" alphatest="on"/>
		<ePixmap pixmap="Default-HD/buttons/yellow.png" position="410,5" size="200,40" alphatest="on"/>
		<ePixmap pixmap="Default-HD/buttons/blue.png" position="610,5" size="200,40" alphatest="on"/>
		<widget source="key_red" render="Label" position="10,5" size="200,40" zPosition="1" font="Regular;20" halign="center" valign="center" backgroundColor="#9f1313" transparent="1" shadowColor="black" shadowOffset="-2,-2"/>
		<widget source="key_green" render="Label" position="210,5" size="200,40" zPosition="1" font="Regular;20" halign="center" valign="center" backgroundColor="#1f771f" transparent="1" shadowColor="black" shadowOffset="-2,-2"/>
		<widget source="key_yellow" render="Label" position="410,5" size="200,40" zPosition="1" font="Regular;20" halign="center" valign="center" backgroundColor="#a08500" transparent="1" shadowColor="black" shadowOffset="-2,-2"/>
		<widget source="key_blue" render="Label" position="610,5" size="200,40" zPosition="1" font="Regular;20" halign="center" valign="center" backgroundColor="#18188b" transparent="1" shadowColor="black" shadowOffset="-2,-2"/>
		<eLabel	position="10,50" size="800,1" backgroundColor="grey"/>
		<widget source="list" render="Listbox" position="10,60" size="800,390" scrollbarMode="showOnDemand">
			<convert type="TemplatedMultiContent">
				{"template": [
					MultiContentEntryPixmapAlphaTest(pos = (10, 6), size = (54, 54), png = 2), # index 3 is the interface pixmap
					MultiContentEntryText(pos = (100, 6), size = (690, 54), font=0, flags = RT_HALIGN_LEFT|RT_VALIGN_CENTER|RT_WRAP, text = 1), # index 1 is the interfacename
				],
				"fonts": [gFont("Regular", 24),gFont("Regular", 18)],
				"itemHeight": 65
				}
			</convert>
		</widget>
		<eLabel	position="10,480" size="800,1" backgroundColor="grey"/>
		<widget source="introduction" render="Label" position="10,488" size="800,25" font="Regular;22" halign="center" transparent="1"/>
	</screen>
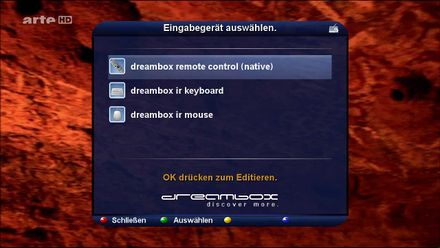
InputDeviceSelection im BlueDreamHD
Hier die Variante ich ich für den BlueDreamHD ausgearbeitet habe.
	<!-- Input Device Selection -->
	<screen name="InputDeviceSelection" position="center,center" size="750,600" title="Select input device" flags="wfNoBorder">

		<!-- Background -->
		<ePixmap position="0,0" size="750,600" zPosition="-5" pixmap="BlueDreamHD/bg_750x600.png"/>
		<eLabel  position="8,46" size="735,515" zPosition="-1" backgroundColor="#200d1940"/>

		<!-- Title & Titelicon -->
		<eLabel text="Select input device"  position="20,6" size="710,30" zPosition="1" halign="center" font="Regular;29" backgroundColor="background" shadowColor="black" shadowOffset="-2,-2" transparent="1"/>
		<ePixmap position="690,6" size="32,32" pixmap="BlueDreamHD/menu/preferences-desktop-peripherals32x32.png" alphatest="blend"/>

		<ePixmap pixmap="BlueDreamHD/sep750.png" position="50,80" size="650,2" zPosition="1"  alphatest="on" />

		<widget source="list" render="Listbox" position="50,100" size="650,280" zPosition="10" scrollbarMode="showOnDemand" selectionPixmap="BlueDreamHD/selpic.png" transparent="1" >
			<convert type="TemplatedMultiContent">
			<!--  device, description, devicepng, divpng  -->
				{"template": [
						MultiContentEntryPixmapAlphaTest(pos = (2, 8), size = (54, 54), png = 2), # index 3 is the interface pixmap
						MultiContentEntryText(pos = (65, 6), size = (650, 54), font=0, flags = RT_HALIGN_LEFT|RT_VALIGN_CENTER|RT_WRAP, text = 1), # index 1 is the interfacename
					],
				"fonts": [gFont("Regular", 28),gFont("Regular", 20)],
				"itemHeight": 70
				}
			</convert>
		</widget>

		<ePixmap pixmap="BlueDreamHD/sep750.png" position="50,400" size="650,2" zPosition="1"  alphatest="on" />

		<widget source="introduction" render="Label" position="0,430" size="750,50" zPosition="10" font="Regular;28" halign="center" valign="center" backgroundColor="background" foregroundColor="foreyellow" shadowColor="black" shadowOffset="-2,-2" transparent="1"/>
		<ePixmap pixmap="BlueDreamHD/icons/dmm_logo.png" position="200,500" size="350,44" alphatest="on" />

		<!-- Buttons & Keycode -->
		<ePixmap pixmap="BlueDreamHD/buttons/red.png" position="25,567" size="25,25" alphatest="on"/>
		<ePixmap pixmap="BlueDreamHD/buttons/green.png" position="200,567" size="25,25" alphatest="on"/>
		<ePixmap pixmap="BlueDreamHD/buttons/yellow.png" position="385,567" size="25,25" alphatest="on"/>
		<ePixmap pixmap="BlueDreamHD/buttons/blue.png" position="555,567" size="25,25" alphatest="on"/>
		<widget source="key_red" render="Label" position="60,567" zPosition="1" size="130,25" font="Regular;24" halign="left" backgroundColor="background" transparent="1" />
		<widget source="key_green" render="Label" position="240,567" zPosition="1" size="130,25" font="Regular;24" halign="left" backgroundColor="background" transparent="1" />
		<widget source="key_yellow" render="Label" position="425,567" zPosition="1" size="130,25" font="Regular;24" halign="left" backgroundColor="background" transparent="1" />
		<widget source="key_blue" render="Label" position="560,567" zPosition="1" size="130,25" font="Regular;24" halign="left" backgroundColor="background" transparent="1" />
	</screen>
InputDeviceSelection im Vergleich
Kurzerklärung der XML
- Wie man hier erkennen kann wird mittels dem Aussdruck "ePixmap pixmap" ein Grafik geladen.
- Mittels dem Ausdruck "zPosition" können wir die Grafiken auch in unterschiedlichen Ebenen über oder Untereinander gelegt darstellen lassen

