First basics for a skin (en): Unterschied zwischen den Versionen
| Zeile 17: | Zeile 17: | ||
== Your first skin.xml == | == Your first skin.xml == | ||
| − | + | The <code>skin.xml</code> is a file which influences the behaviour of the skin. <br> | |
| − | + | Normally this is the place where most of the screens are "skinned", the screens which were not skinned will be displayed using the '''"default-skin"'''. | |
| − | + | This means the structure of the Defaultskins is a good stating point for skinning. Also if something is changed in the [[OE 2.0]] images, the '''Defaultskin''' should be the first skin which displays the new functions without problems. With the introduction of the new OE 2.0 a new HD skin '''Default-HD''' was introduced. It's allways a good idea to take a look at this one. | |
| − | + | Later you can check the differences in the skins, look into the details and see what change is causing a specific change. | |
| − | {{Hinweis| | + | {{Hinweis|The '''skin.xml''' can be found in: '''usr/share/enigma2/''' in the corresponding '''directory''' of the installed skin.}} |
| − | + | To start with your first skin which will start(without graphics, ...). Create following items in '''usr/share/enigma2/''': | |
| − | * | + | * a new directory for your new skin (in this example we use BlackdreamHD) |
| − | * | + | * a file <code>skin.xml</code> with minimal content '''(from the Skin Default-HD)''' |
| − | + | The <code>skin.xml</code> in [[OE 2.0]], must contain following items to be bootable and not causing a [[Green Screen|crasht]]: | |
| − | * | + | * the definition of the skins '''<skin> </skin>''' |
| − | * | + | * the definition of the resolution '''<output id="0"> </output>''' |
| − | * | + | * the definition the colors '''<colors> </colors>''' |
| − | * | + | * the definition the fonts '''<fonts> </fonts>''' (was not needed in OE 1.6) |
| − | * | + | * the definition of the window colors '''<windowstyle> </windowstyle>''' |
| Zeile 103: | Zeile 103: | ||
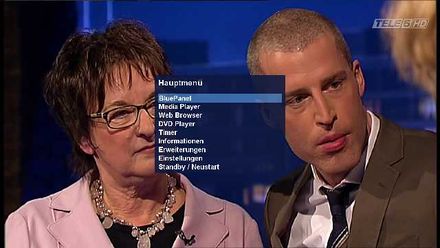
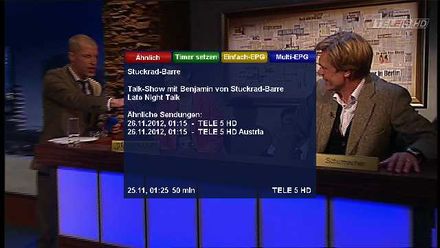
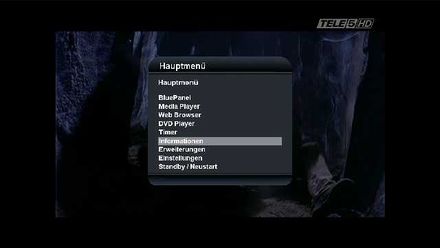
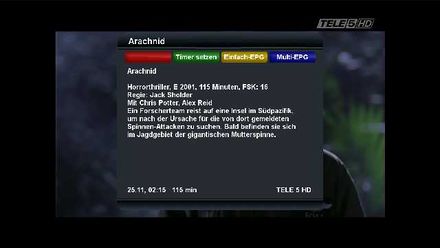
| − | + | Now we have no infobar and zapping occurs blind. Also the menu is very rudimentary. | |
| − | + | But the goal was to create a minimal skin which will not crash. | |
{| | {| | ||
| − | |[[Bild:skin_minimal_Hauptmenue.jpg|left|thumb|440px| | + | |[[Bild:skin_minimal_Hauptmenue.jpg|left|thumb|440px|Minimal menu without extra graphics]] || |
| − | |[[Bild:skin_minimal_infoscreen.jpg|right|thumb|440px| | + | |[[Bild:skin_minimal_infoscreen.jpg|right|thumb|440px|Info window, for the buttons the graphics from the default skin are used]] || |
|} | |} | ||
Back to top [[#top | TOC:]] | Back to top [[#top | TOC:]] | ||
| − | |||
== Erklärung zur skin.xml == | == Erklärung zur skin.xml == | ||
Version vom 29. November 2012, 14:15 Uhr
Inhaltsverzeichnis
Introduction
This article explains the basics for a skin, which meets following conditions:
- serves a basis for the
skin.xml
- and can be startet without crash
Back to top TOC:
Your first skin.xml
The skin.xml is a file which influences the behaviour of the skin.
Normally this is the place where most of the screens are "skinned", the screens which were not skinned will be displayed using the "default-skin".
This means the structure of the Defaultskins is a good stating point for skinning. Also if something is changed in the OE 2.0 images, the Defaultskin should be the first skin which displays the new functions without problems. With the introduction of the new OE 2.0 a new HD skin Default-HD was introduced. It's allways a good idea to take a look at this one.
Later you can check the differences in the skins, look into the details and see what change is causing a specific change.
| The skin.xml can be found in: usr/share/enigma2/ in the corresponding directory of the installed skin. |
To start with your first skin which will start(without graphics, ...). Create following items in usr/share/enigma2/:
- a new directory for your new skin (in this example we use BlackdreamHD)
- a file
skin.xmlwith minimal content (from the Skin Default-HD)
The skin.xml in OE 2.0, must contain following items to be bootable and not causing a crasht:
- the definition of the skins <skin> </skin>
- the definition of the resolution <output id="0"> </output>
- the definition the colors <colors> </colors>
- the definition the fonts <fonts> </fonts> (was not needed in OE 1.6)
- the definition of the window colors <windowstyle> </windowstyle>
<skin>

	<!-- Head for Image resolution -->
	<output id="0">
	  <resolution xres="1280" yres="720" bpp="32" />
	</output>


	<!-- Colors (#AARRGGBB) -->
	<colors>
		<color name="black" value="#000000"/>
		<color name="white" value="#ffffff"/>
		<color name="grey" value="#b3b3b9"/>
		<color name="grey2" value="#d3d3d9"/>
		<color name="dark" value="#20062748"/>
		<color name="menu" value="#20062748"/>
		<color name="red" value="#f23d21"/>
		<color name="green" value="#389416"/>
		<color name="blue" value="#0064c7"/>
		<color name="yellow" value="#bab329"/>
		<color name="transparent" value="#ff000000"/>
		<color name="transpBlack" value="#80000000"/>
		<color name="transpWhite" value="#80ffffff"/>
		<color name="background" value="#200d1940"/>
		<color name="foreground" value="#ffffff"/>
	</colors>


	<!-- Fonts -->
	<fonts>
		<font filename="nmsbd.ttf" name="Regular" scale="100"/>
		<font filename="lcd.ttf" name="LCD" scale="100"/>
		<font filename="ae_AlMateen.ttf" name="Replacement" scale="100" replacement="1"/>
		<font filename="tuxtxt.ttf" name="Console" scale="100"/>
	</fonts>


	<!-- Main screen colors (id=0 Framebuffer) -->
	<windowstyle type="skinned" id="0">
		<title offset="15,9" font="Regular;26" />
		<color name="Background" color="#200d1940"/>
		<color name="LabelForeground" color="#ffffff"/>
		<color name="ListboxBackground" color="#200d1940"/>
		<color name="ListboxForeground" color="#ffffff"/>
		<color name="ListboxSelectedBackground" color="#204176b6"/>
		<color name="ListboxSelectedForeground" color="#ffffff"/>
		<color name="ListboxMarkedBackground" color="#200d1940"/>
		<color name="ListboxMarkedForeground" color="#00ff00"/>
		<color name="ListboxMarkedAndSelectedBackground" color="#204176b6"/>
		<color name="ListboxMarkedAndSelectedForeground" color="#00ff00"/>
		<color name="WindowTitleForeground" color="#ffffff"/>
		<color name="WindowTitleBackground" color="#16244b"/>
	</windowstyle>

</skin>
Now we have no infobar and zapping occurs blind. Also the menu is very rudimentary.
But the goal was to create a minimal skin which will not crash.
Back to top TOC:
Erklärung zur skin.xml
Wie der Name der skin.xml schon sagt handelt der ganze Aufbau eines Skins aus der einer Scriptsprache, die den Namen XML trägt.
Die XML arbeitet mit Elementen und der Skin selbst wird ja mittels dem ersten Element <skin> gestartet, beendet wird der Skin mittels </skin>
Dazwischen werden die anderen Benötigten Elemente eingebaut. Wobei es immer nach dem gleichen Schema abläuft, das gewünschte Element starten mit den zwei Pfeilen <Elementanfang> und endet wenn nach dem ersten Pfeil ein Backslash / gesetzt wird </Elementende>.
Back to top TOC:
Kommentare
Kommentare können wie folgt eingefügt werden:
<!-- dies ist ein Kommentar -->

<!-- mit diesem Zeichen beginnt ein Kommentar
     und endet erst
     wenn diese
     Zeichenkette folgt -->
Natürlich kann man auch bei Änderungen an der skin.xml auf diesem Wege auch gewisse Zeilen und Elemente "Auskommentieren" damit diese beim nächsten Start nicht mehr mit eingelesen werden.
Back to top TOC:
Elemente
<!-- Das Ausgabe Element definiert folgendes -->
	<output id="0"> <!-- Wohin der Output geht, id="0" ist der Bildschirm, (id=1 LCD), (id=2 Color OLED (dm800se) -->
	  <resolution xres="1280" yres="720" bpp="32" /> <!-- Die Größe bzw. die Auflösung des Skins -->
	</output> <!-- Ende des Output Elements -->
<!-- Im Farben-Element werden mittels dem dem HTML-Farbcode Farben zugewiesen -->
	<colors> <!-- Element Anfang -->
		<color name="black" value="#000000"/>
		<color name="white" value="#ffffff"/>
		<!-- Durch die zuweisung können wir im Skin Namen für Farbwünsche verwenden
                     und müssen nicht immer nachschauen welchen Farbcode unsere Wunschfarbe besitzt -->
	</colors> <!-- Element Ende -->
<!-- Fonts, englisch für die Schriftzeichen -->
	<fonts>
		<font filename="nmsbd.ttf" name="Regular" scale="100"/>
		<font filename="lcd.ttf" name="LCD" scale="100"/>
		<font filename="ae_AlMateen.ttf" name="Replacement" scale="100" replacement="1"/>
		<font filename="tuxtxt.ttf" name="Console" scale="100"/>
<!-- Dies sind die Standardschriftzeichen, wer andere verwenden will muss diese sich erst installieren -->
	</fonts>
	<!-- Main screen colors (id=0 Framebuffer) -->
<!-- Hier werden die Farben der verschiedenen Fenster-Elemete festgelegt weiterhin den verwendeten Schriftsatz und dessen Größe -->
	<windowstyle type="skinned" id="0">
		<title offset="15,9" font="Regular;26" />
		<color name="Background" color="#200d1940"/>
		<color name="LabelForeground" color="#ffffff"/>
		<color name="ListboxBackground" color="#200d1940"/>
		<color name="ListboxForeground" color="#ffffff"/>
		<color name="ListboxSelectedBackground" color="#204176b6"/>
		<color name="ListboxSelectedForeground" color="#ffffff"/>
		<color name="ListboxMarkedBackground" color="#200d1940"/>
		<color name="ListboxMarkedForeground" color="#00ff00"/>
		<color name="ListboxMarkedAndSelectedBackground" color="#204176b6"/>
		<color name="ListboxMarkedAndSelectedForeground" color="#00ff00"/>
		<color name="WindowTitleForeground" color="#ffffff"/>
		<color name="WindowTitleBackground" color="#16244b"/>
	</windowstyle>
Wer gerne in seinem Skin aber gerahmte Fenster verwenden will wird auch hier in der skin.xml des Default-HD fündig wie dies Aufgebaut ist:
Dies ist auch ein Unter-Element das dann in das Haupt-Element des windowstyle eingefügt werden muss!!
	<!-- screen border png's -->
	<borderset name="bsWindow">
		<pixmap pos="bpTopLeft" filename="Default-HD/b_tl.png" />
		<pixmap pos="bpTop" filename="Default-HD/b_t.png"  />
		<pixmap pos="bpTopRight" filename="Default-HD/b_tr.png" />
		<pixmap pos="bpLeft" filename="Default-HD/b_lr.png"  />
		<pixmap pos="bpRight" filename="Default-HD/b_lr.png"  />
		<pixmap pos="bpBottomLeft" filename="Default-HD/b_bl.png" />
		<pixmap pos="bpBottom" filename="Default-HD/b_b.png"  />
		<pixmap pos="bpBottomRight" filename="Default-HD/b_br.png" />
	</borderset>
Komplett würde dies dann so Aussehen wie man es vom Default-HD Skin her gewohnt ist. Wer hier nun andere Grafiken haben will muss sich diese dann selbst erstellen.
Back to top TOC:
Screens (Fenster)
Fenster bzw. Screen werden etwas später zwar erst behandelt, aber es passt hier halt mal mit rein bei dem Aufbau.
<!-- ein einfacher Screen beginnt mit dem Zeichen "<screen" und endet mit diesem Zeichen "/>" -->
<screen name="SubtitleDisplay" position="0,0" size="1280,720" zPosition="-1" flags="wfNoBorder" backgroundColor="transparent"/>
<!-- ein erweiterter Screen beginnt mit dem Zeichen "<screen" -->
                <screen name="MoviePlayer" position="0,561" size="1280,133" title="InfoBar" backgroundColor="transparent" flags="wfNoBorder"
		<ePixmap pixmap="Default-HD/icons/icon_event.png" position="60,20" size="20,13" alphatest="on" />
		<widget source="session.CurrentService" render="Label" position="100,12" size="850,27" font="Regular;24" valign="top" noWrap="1" backgroundColor="#263c59" transparent="1">
			<convert type="ServiceName">Name</convert>
		</widget>
                </screen> <!-- Endet aber somit! -->
<!-- Denn im erweitertem Fenster können oder müssen ja auch verschiedene Grafiken,Label und Widget integriert werden -->
Back to top TOC:
zum eigenen Skin
Nachdem wir nun die Minimal-Konfiguration kennen, editiere ich mir nun die skin.xml folgendermaßen:
- einfügen von meiner eigenen Grafik "borderset" also wie die Fenster aussehen sollen
- Anpassen der Farbpalette an meinen eigenen Wünschen
Das ganze sieht dann so aus:
<skin>
	<!--  Skin:  BlackDreamHD for OE2.0 by EgLe (c)2012     -->
	<!--  This skin skin and all it's graphics are free. Everyone can modify and use it in other images.    -->
	<!-- Spezial Thanks to Kerni and Vali for his great Skins, Renderer,Converter and Wonderfull Idea  -->
	<!--  BUT DO NOT REMOVE OR CHANGE THE SECOND LINE !!!    -->


	<!-- Head for Image resolution -->
	<output id="0">
	  <resolution xres="1280" yres="720" bpp="32" />
	</output>


	<!-- Colors (#AARRGGBB) -->
	<colors>
		<color name="white"		value="#ffffff" />
		<color name="black"		value="#000000" />
		<color name="dark" 		value="#25062748" />
		<color name="red" 		value="#f23d21" />
		<color name="green" 		value="#5bac3f" />
		<color name="blue" 		value="#21b0cf" />
		<color name="grey" 		value="#90a0a0" />
		<color name="yellow" 		value="#00e5b243" />
		<color name="lightgrey" 	value="#8c8c93" />
		<color name="darkgrey"		value="#777777" />
		<color name="transparent" 	value="#ffffffff" />
		<color name="transpBlack" 	value="#80000000" />
		<color name="transpWhite" 	value="#80ffffff" />
		<color name="transpyellow"	value="#33bab329" />
		<color name="background"	value="#25272d33" />
		<color name="foreground"	value="#ffffff" />
		<color name="foreyellow"	value="#cc9329" />
	</colors>


	<!-- Fonts -->
	<fonts>
		<font filename="nmsbd.ttf" name="Regular" scale="95" />
		<font filename="lcd.ttf" name="LCD" scale="100" />
		<font filename="ae_AlMateen.ttf" name="Replacement" scale="95" replacement="1" />
		<font filename="tuxtxt.ttf" name="Console" scale="100" />
	</fonts>


	<!-- Main screen colors (id=0 Framebuffer) -->
	<windowstyle type="skinned" id="0">
		<title offset="33,14" font="Regular;27" />
		<color name="Background"				color="#272d33" />
		<color name="LabelForeground"			        color="#ffffff" />
		<color name="ListboxBackground" 			color="#272d33" />
		<color name="ListboxForeground" 			color="#ffffff" />
		<color name="ListboxSelectedBackground"                 color="#8c8c93" />
		<color name="ListboxSelectedForeground"                 color="#ffffff" />
		<color name="ListboxMarkedBackground"		        color="#2a2d2f" />
		<color name="ListboxMarkedForeground"                   color="#389416" />
		<color name="ListboxMarkedAndSelectedBackground"	color="#2a2d2f" />
		<color name="ListboxMarkedAndSelectedForeground"	color="#f23d21" />
		<color name="WindowTitleForeground"		        color="#ffffff" />
		<color name="WindowTitleBackground"		        color="#232a33" />

		<!-- Main screen border png's -->
		<borderset name="bsWindow">
			<pixmap pos="bpTopLeft" filename="BlackDreamHD/b_tl.png" />
			<pixmap pos="bpTop" filename="BlackDreamHD/b_t.png"  />
			<pixmap pos="bpTopRight" filename="BlackDreamHD/b_tr.png" />
			<pixmap pos="bpLeft" filename="BlackDreamHD/b_l.png"  />
			<pixmap pos="bpRight" filename="BlackDreamHD/b_r.png"  />
			<pixmap pos="bpBottomLeft" filename="BlackDreamHD/b_bl.png" />
			<pixmap pos="bpBottom" filename="BlackDreamHD/b_b.png"  />
			<pixmap pos="bpBottomRight" filename="BlackDreamHD/b_br.png" />
		</borderset>
	</windowstyle>

</skin>
Und starte dann dan Enigma2 neu um die Änderungen zu übernehmen:
sämtliche Menüfenster wie die Einstellungen, Timer und auch der Mediaplayer werden, da nichts gesetzt wurde hier von dem Defaultskin ausgegeben.
Back to top TOC:
Lesbarkeit der skin.xml
Persönlich finde ich das man wie in jeder Sprache (Script, Progammier usw.) eine klare Struktur und Übersicht haben sollte.
Dies macht nicht nur für den Anfänger das ganze etwas Leichter sondern dient auch der Übersicht um eigene Fehler usw. zu finden.
Mit Kommentare sollte man sparsam umgehen, aber auch nicht geizen damit es eben klar und Übersichtlich bleibt.
Da der Grundskin soweit nun läuft ohne Crashs kommen die nächsten Elemete und auch evtl. eigene Grafiken zum Einsatz.
Hierbei folge ich meiner persönlichen Struktur und Reihenfolge die nicht eingehalten werden muss!
Hier kann man aber bei den jeweiligen Skinner und Mods mit ein bisschen Übung aber auch bald eine eigene "Typische Handschrift" erkennen...
Back to top TOC:


