Netscan GP4 (en): Unterschied zwischen den Versionen
Mfgeg (Diskussion | Beiträge) (Die Seite wurde neu angelegt: „{|width="40%" |Bild:deutsch.png - in Deutsch |Bild:english.png - in English |} Datei:Netscan GP4.png|right|th…“) |
|||
| (2 dazwischenliegende Versionen desselben Benutzers werden nicht angezeigt) | |||
| Zeile 3: | Zeile 3: | ||
|[[Bild:english.png]] - [[Netscan GP4 (en)|in English]] | |[[Bild:english.png]] - [[Netscan GP4 (en)|in English]] | ||
|} | |} | ||
| − | [[Datei:Netscan GP4.png|right|thumb|400px| | + | [[Datei:Netscan GP4.png|right|thumb|400px|Netscan bei der Arbeit]] |
| + | |||
| + | The package <code>gemininetscan</code> consists of 2 plugins: | ||
| + | * Netscan | ||
| + | * Automount | ||
| + | |||
| + | == Netscan == | ||
| + | Once the plugin is opened, the automatic search for network shares in the internal network is started. | ||
| + | First select a server, and with {{Red|red}} or {{Taste|OK}} open the list of available network shares. | ||
| + | Now you can select one of the network shares with the arrow buttons, and confirm the selection with {{Green|green}}. | ||
| + | In the next window the plugin suggests the settings, if wanted you can change these parameters. Confirm the settings with {{Green|green}}. | ||
| + | The Automount window is opened and the server with the network share is displayed. Save and start this mount with {{Yellow|yellow}}, now the mount is accessible. | ||
| + | |||
| + | == Automount == | ||
| + | With the Automount Plugin it's also possible to add mounts manually with the {{Green|green}} button. | ||
| + | There is a choice for 2 types: | ||
| + | |||
| + | * Samba share or | ||
| + | * NFS share | ||
| + | |||
| + | Select one of both and confirm with {{Taste|OK}}. | ||
| + | In the following window you need to enter the settings for mounting the network share. Save these setting with the {{Taste|OK}} button. | ||
| + | The Automount window is opened and the server with the network share is displayed. Save and start this mount with {{Yellow|yellow}}, now the mount is accessible. | ||
| + | |||
| + | === Automount mounts === | ||
| + | The mounts can be accessed over <code>/media/gp4share/xxx</code>. | ||
| + | |||
| + | === Automount configuration file === | ||
| + | * The Automount plugin adds the mounts in the file <code>[[auto.gemini4|auto.gemini4]]</code>, which can be found in <code>/etc</code>. | ||
| + | |||
| + | == Screenshots == | ||
| + | <gallery> | ||
| + | Datei:Nescan Search GP4.png| Search network shares | ||
| + | Datei:Automount Settings GP4.png|Edit settings | ||
| + | Datei:Automount GP4.png| Netwerk share mounted | ||
| + | </gallery> | ||
| + | |||
| + | [[Kategorie:GP4 (en)]] | ||
Aktuelle Version vom 22. September 2018, 22:44 Uhr

The package gemininetscan consists of 2 plugins:
- Netscan
- Automount
Inhaltsverzeichnis
Netscan
Once the plugin is opened, the automatic search for network shares in the internal network is started. First select a server, and with red or OK open the list of available network shares. Now you can select one of the network shares with the arrow buttons, and confirm the selection with green. In the next window the plugin suggests the settings, if wanted you can change these parameters. Confirm the settings with green. The Automount window is opened and the server with the network share is displayed. Save and start this mount with yellow, now the mount is accessible.
Automount
With the Automount Plugin it's also possible to add mounts manually with the green button. There is a choice for 2 types:
- Samba share or
- NFS share
Select one of both and confirm with OK. In the following window you need to enter the settings for mounting the network share. Save these setting with the OK button. The Automount window is opened and the server with the network share is displayed. Save and start this mount with yellow, now the mount is accessible.
Automount mounts
The mounts can be accessed over /media/gp4share/xxx.
Automount configuration file
- The Automount plugin adds the mounts in the file
auto.gemini4, which can be found in/etc.
Screenshots
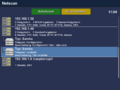
Search network shares
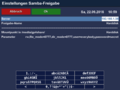
Edit settings
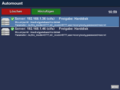
Netwerk share mounted


