Widgets GP4 (en): Unterschied zwischen den Versionen
Mfgeg (Diskussion | Beiträge) |
Mfgeg (Diskussion | Beiträge) |
||
| Zeile 17: | Zeile 17: | ||
== Picon management: == | == Picon management: == | ||
| − | |||
In the original image, the Picons can be stored in <code>/usr/share/enigma2/picon</code> or <code>/data/picon</code> or <code>/usr/share/enigma2/picon_oled</code> (these paths can be different for alternative images). If you want to set an alternative path, you need to switch '''On''' the option Change Picon path (Restart Enigma). After the required Enigma 2 restart, this feature is available. | In the original image, the Picons can be stored in <code>/usr/share/enigma2/picon</code> or <code>/data/picon</code> or <code>/usr/share/enigma2/picon_oled</code> (these paths can be different for alternative images). If you want to set an alternative path, you need to switch '''On''' the option Change Picon path (Restart Enigma). After the required Enigma 2 restart, this feature is available. | ||
| Zeile 26: | Zeile 25: | ||
* Picon for Channellist | * Picon for Channellist | ||
| − | {{|Download directory for picons from the | + | {{Hinweis|Download directory for picons from the Blue Panel is <code>/data/ piconpool</code> and can not be changed in the widget extension.}} |
When downloading picons from the Blue Panel, a sub folder will be created in <code>/data/piconpool</code> for each picon package. This way it's easy to change the picons, just select the desired folder for: | When downloading picons from the Blue Panel, a sub folder will be created in <code>/data/piconpool</code> for each picon package. This way it's easy to change the picons, just select the desired folder for: | ||
Version vom 28. Oktober 2018, 11:19 Uhr
With the widgets plugin you can use these Gemini Project 4 features:
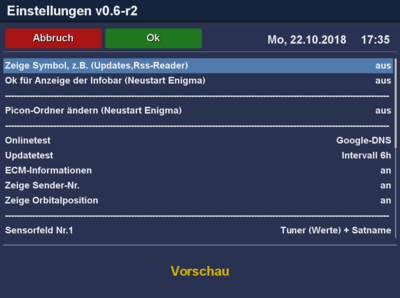
- Shows an UPD icon in the infobar, with activated update test.
- Optionally, an icon for system updates, RSS reader updates or calendar information appears at the top left of the TV.
- Path for the Picon settings selectable.
- Online test.
- Channel number and / or orbital position in the infobar.
- Shows ECM informations.
- Settings for different sensor fields in the infobar.
Inhaltsverzeichnis
Picon management:
In the original image, the Picons can be stored in /usr/share/enigma2/picon or /data/picon or /usr/share/enigma2/picon_oled (these paths can be different for alternative images). If you want to set an alternative path, you need to switch On the option Change Picon path (Restart Enigma). After the required Enigma 2 restart, this feature is available.
We recommend to create in a selected device a folder piconpool. Afterwards select this folder in:
- Picon for Infobar
- Picon for Display
- Picon for Channellist
Download directory for picons from the Blue Panel is /data/ piconpool and can not be changed in the widget extension.
|
When downloading picons from the Blue Panel, a sub folder will be created in /data/piconpool for each picon package. This way it's easy to change the picons, just select the desired folder for:
- Picon for Infobar
- Picon for Display
- Picon for Channellist
and save the setting with green.
Of course it's also possible to copy the Picons manually onto the Box in a specific folder, and use the folder(s).
Online test:
Toggle the Onlinetest with the buttons "right" and "left" to enable or disable this option. Depending on the skin, you will see in the infobar the status of the internet connection.
Update test:
For the update test there are several options: "off", "Interval 6h", "Interval 12h" and "Interval 24h". Once the update test is activated, this will be performed after a reboot of the box or Enigma 2, or by opening the Addon-Manager. This test will then be repeated with the selected interval. If there are updates, an UPD icon appears in the info bar.
Sensor fields:
For the usage of the sensor fields, a GP4 Skin or a Skin with GP4 support is mandatory. Up to 10 sensor fields can be set in the settings. Select the desired field with the buttons "up" and "down", now you can choose an info with "right" and "left". Once the settings are made (considering the supported fields in the Skin), you need to save the settings with green.
