GP3.2 OpenVPN (en): Unterschied zwischen den Versionen
| (34 dazwischenliegende Versionen von 2 Benutzern werden nicht angezeigt) | |||
| Zeile 1: | Zeile 1: | ||
| − | |||
| − | |||
| − | |||
{|width="40%" | {|width="40%" | ||
|[[Bild:deutsch.png]] - [[GP3.2 OpenVPN|in Deutsch]] | |[[Bild:deutsch.png]] - [[GP3.2 OpenVPN|in Deutsch]] | ||
|[[Bild:english.png]] - [[GP3.2 OpenVPN (en)|in English]] | |[[Bild:english.png]] - [[GP3.2 OpenVPN (en)|in English]] | ||
|} | |} | ||
| − | {| | + | {{GP|This article is valid for Gemini plugin version GP 3.2 and GP 3.3}} |
| − | + | [[Datei:GP3 OpenVPN.png|right|thumb|400px|OpenVPN with active client]] | |
| − | + | After installing the '''geminiopenvpn''' Plugin you have an [http://en.wikipedia.org/wiki/OpenVPN OpenVPN] Server or Client which is easy to configure. The plugin uses [http://en.wikipedia.org/wiki/Public_key_certificate certificates] (Server-Multi-Client). The connection on the OpenVPN Server is made over an encrypted [http://en.wikipedia.org/wiki/Transport_Layer_Security TLS] connection. | |
| − | |||
| − | |||
| − | |||
| − | |||
| − | |||
| − | + | For connections the OpenVPN Server Plugin creates a virtual network interface (tap0), which is connected over a network bridge (br0) with the internal network adapter (eth0) of the Dreambox. One or more OpenVPN clients get an IP address of the internal network and can access all available services without additional routing. | |
| − | |||
| − | + | The mode used by OpenVPN is [http://en.wikipedia.org/wiki/OpenVPN#Bridging Bridging]. With this mode the [http://en.wikipedia.org/wiki/Broadcast Broadcasts] are forwarded without any problem. Same for network protocols like IPv4, IPv6, Netalk, IPX, ... | |
| − | + | ==== Requirements for using OpenVPN ==== | |
| + | * OE 2.0 or OE 2.2 image with GP3 Plugin. | ||
| + | * OpenVPN Plugin must be installed, configured and started. | ||
| + | * The OpenVPN Server supports only a cabled network (no Wlan). | ||
| + | * Portforwarding on the router to the Dreambox (Port 1194/UDP). | ||
| + | * For reaching the Server you need to know your WAN IP, or use a [http://dnslookup.me/dynamic-dns/ DDNS] Service (e.g. [http://www.no-ip.com/ No-IP]). | ||
| + | * For access you need to create certificates for each client. | ||
| + | * OpenVPN needs to be installed on clients. Protocols like IPSec, IKE, PPTP, or L2TP are not supported. | ||
| + | * Server Lan and Client Lan must be different. | ||
| + | == Installation / Deinstallation == | ||
| + | The <code>geminiopenvpn</code> plugin can be installed / removed in different ways: | ||
| + | {{Hauptbeitrag (en)|GP3 Addons (en){{!}}GP3 Addons| - Category: Gemini Plugins}} | ||
| + | {{Hauptbeitrag (en)|WebAdmin (en){{!}}WebAdmin| - Package name: <code>geminiopenvpn</code>}} | ||
| + | {{Hauptbeitrag (en)|OPKG (en){{!}}OPKG| - Package name: <code>geminiopenvpn</code>}} | ||
| + | After the installation restart the Dreambox. | ||
| − | |||
| − | |||
| − | |||
| − | |||
| − | |||
| − | |||
| − | |||
| − | |||
| − | |||
| − | |||
| − | |||
| − | |||
| − | |||
| − | |||
| − | |||
= OpenVPN Server = | = OpenVPN Server = | ||
| + | == Create Root Certificate == | ||
| + | [[Bild:GP3 OpenVPN root Zertifikat.png|thumb|none|root certificate - Skin example: gp-skin-dmconcinnity-mod|480px]] | ||
| − | + | Now we create the keys and certificates for the [http://en.wikipedia.org/wiki/Zertifizierungsstelle Certificate Authority] (CA). Open the '''OpenVPN Server''' Plugin and push the '''[green]''' button for certificates. | |
| − | |||
| − | |||
| − | |||
| − | + | Choose '''root-certificate''' and change the settings as described in the list. For all parameters only '''letters''' and '''numbers''' can be used. | |
| − | |||
| − | |||
| − | |||
| − | |||
| − | |||
| − | |||
| − | |||
| − | |||
{| border=1 style="text-align:center; margin:1em 1em 1em 0; background:#D0D0D0; border:1px #000000 solid; border-collapse:collapse; empty-cells:show;" CELLPADDING=2 CELLSPACING=0" | {| border=1 style="text-align:center; margin:1em 1em 1em 0; background:#D0D0D0; border:1px #000000 solid; border-collapse:collapse; empty-cells:show;" CELLPADDING=2 CELLSPACING=0" | ||
| − | | width="160px" | ''' | + | | width="160px" | '''Parameter''' |
| − | | width="700px" | ''' | + | | width="700px" | '''Description''' |
|- style="text-align:center; margin:1em 1em 1em 0; background:#FFFFFF" | |- style="text-align:center; margin:1em 1em 1em 0; background:#FFFFFF" | ||
| − | | width="70px" | ''' | + | | width="70px" | '''Password''' |
| − | | width="600px" | | + | | width="600px" | Enter a Password. Memorize the password, you will need the password for creating Server and Client certificates or for blocking a certificate. |
|- style="text-align:center; margin:1em 1em 1em 0; background:#FFFFFF" | |- style="text-align:center; margin:1em 1em 1em 0; background:#FFFFFF" | ||
| − | | width="70px" | ''' | + | | width="70px" | '''valid for x years''' |
| − | | width="600px" | | + | | width="600px" | Enter the validity period for the certificate in years. |
|- style="text-align:center; margin:1em 1em 1em 0; background:#FFFFFF" | |- style="text-align:center; margin:1em 1em 1em 0; background:#FFFFFF" | ||
| − | | width="70px" | ''' | + | | width="70px" | '''Project''' |
| − | | width="600px" | | + | | width="600px" | Enter a Project name for the certificate creation. |
|- style="text-align:center; margin:1em 1em 1em 0; background:#F0F0F0" | |- style="text-align:center; margin:1em 1em 1em 0; background:#F0F0F0" | ||
| − | | width="70px" | ''' | + | | width="70px" | '''Country''' |
| − | | width="600px" | | + | | width="600px" | Enter the country. |
|- style="text-align:center; margin:1em 1em 1em 0; background:#F0F0F0" | |- style="text-align:center; margin:1em 1em 1em 0; background:#F0F0F0" | ||
| − | | width="70px" | ''' | + | | width="70px" | '''City''' |
| − | | width="600px" | | + | | width="600px" | Enter the city. |
|- style="text-align:center; margin:1em 1em 1em 0; background:#F0F0F0" | |- style="text-align:center; margin:1em 1em 1em 0; background:#F0F0F0" | ||
| − | | width="70px" | ''' | + | | width="70px" | '''State''' |
| − | | width="600px" | | + | | width="600px" | Enter the state. |
|} | |} | ||
| − | + | Save the settings with the '''[green]''' button. The corresponding files will be created and saved in the directory /etc/ssl/openvpn. | |
| + | == Create Server Certificate == | ||
| + | [[Bild:GP3 OpenVPN Server Zertifikat.png|thumb|none|Server certificate|480px]] | ||
| − | + | Open the '''OpenVPN Server''' Plugin and push the '''[green]''' button for certificates. Push again the '''[green]''' button and choose as type the setting '''Server''' and change the settings as described in the list. | |
| − | |||
| − | |||
| − | |||
| − | |||
| − | |||
| − | |||
{| border=1 style="text-align:center; margin:1em 1em 1em 0; background:#D0D0D0; border:1px #000000 solid; border-collapse:collapse; empty-cells:show;" CELLPADDING=2 CELLSPACING=0" | {| border=1 style="text-align:center; margin:1em 1em 1em 0; background:#D0D0D0; border:1px #000000 solid; border-collapse:collapse; empty-cells:show;" CELLPADDING=2 CELLSPACING=0" | ||
| − | | width="160px" | ''' | + | | width="160px" | '''Parameter''' |
| − | | width="700px" | ''' | + | | width="700px" | '''Description''' |
|- style="text-align:center; margin:1em 1em 1em 0; background:#FFFFFF" | |- style="text-align:center; margin:1em 1em 1em 0; background:#FFFFFF" | ||
| − | | width="70px" | ''' | + | | width="70px" | '''valid for x years''' |
| − | | width="600px" | | + | | width="600px" | Enter the validity period for the certificate in years. |
|} | |} | ||
| − | + | Save the settings with the '''[green]''' button to create the certificates. You will be prompted to enter the password (which was entered while creating the '''root certificate'''). When a wrong password is entered the following error message is displayed: '''can't generate certificate'''. | |
| − | + | When the correct password is entered the certificates, keys and the [http://en.wikipedia.org/wiki/Diffie-Hellman-Schl%C3%BCsselaustausch Diffie-Hellman] parameters are created. This can take some minutes (up to 30 min), the status is displayed in the plugin. The plugin can be closed while the creation is in progress, the process continues in background. | |
| + | == Create Client Certificate(s) == | ||
| + | [[Bild:GP3 OpenVPN Klient Zertifikat.png|thumb|none|Client certificate|480px]] | ||
| − | + | Open the '''OpenVPN Server''' Plugin and push the '''[green]''' button for certificates. Push again the '''[green]''' button and choose as type the setting '''Client''' and change the settings as described in the list. | |
| − | |||
| − | |||
| − | |||
| − | |||
| − | |||
| − | |||
{| border=1 style="text-align:center; margin:1em 1em 1em 0; background:#D0D0D0; border:1px #000000 solid; border-collapse:collapse; empty-cells:show;" CELLPADDING=2 CELLSPACING=0" | {| border=1 style="text-align:center; margin:1em 1em 1em 0; background:#D0D0D0; border:1px #000000 solid; border-collapse:collapse; empty-cells:show;" CELLPADDING=2 CELLSPACING=0" | ||
| − | | width="160px" | ''' | + | | width="160px" | '''Parameters''' |
| − | | width="700px" | ''' | + | | width="700px" | '''Description''' |
|- style="text-align:center; margin:1em 1em 1em 0; background:#FFFFFF" | |- style="text-align:center; margin:1em 1em 1em 0; background:#FFFFFF" | ||
| − | | width="70px" | ''' | + | | width="70px" | '''valid for x years''' |
| − | | width="600px" | | + | | width="600px" | Enter the validity period for the certificate in years. |
|- style="text-align:center; margin:1em 1em 1em 0; background:#FFFFFF" | |- style="text-align:center; margin:1em 1em 1em 0; background:#FFFFFF" | ||
| width="70px" | '''Name:''' | | width="70px" | '''Name:''' | ||
| − | | width="600px" | | + | | width="600px" | Desired name for the client. |
| − | + | If more client certificates are used, each must have a '''different''' name. | |
|} | |} | ||
| − | + | Save the settings with the '''[green]''' button to create the certificates. You will be prompted to enter the password (which was entered while creating the '''root certificate'''). When a wrong password is entered the following error message is displayed: '''can't generate certificate'''. | |
| − | + | When the correct password is entered the client certificate, key and configuration file can be found in the following directory: | |
/etc/ssl/openvpn | /etc/ssl/openvpn | ||
| − | + | These files (three files for each client) will be used later on the OpenVPN clients to set up a connection with the server. The needed files look like follows, e.g. if the entered name was '''7020hd'''. In addition to the three files every client needs the Root Certificate (vpn-ca.pem). | |
{| border=1 style="text-align:center; margin:1em 1em 1em 0; background:#D0D0D0; border:1px #000000 solid; border-collapse:collapse; empty-cells:show;" CELLPADDING=2 CELLSPACING=0" | {| border=1 style="text-align:center; margin:1em 1em 1em 0; background:#D0D0D0; border:1px #000000 solid; border-collapse:collapse; empty-cells:show;" CELLPADDING=2 CELLSPACING=0" | ||
| − | | width="160px" | ''' | + | | width="160px" | '''File name''' |
| − | | width="700px" | ''' | + | | width="700px" | '''Description''' |
|- style="text-align:center; margin:1em 1em 1em 0; background:#FFFFFF" | |- style="text-align:center; margin:1em 1em 1em 0; background:#FFFFFF" | ||
| width="70px" | '''7020hd-cert.pem''' | | width="70px" | '''7020hd-cert.pem''' | ||
| − | | width="600px" | | + | | width="600px" | Client Certificate. |
|- style="text-align:center; margin:1em 1em 1em 0; background:#FFFFFF" | |- style="text-align:center; margin:1em 1em 1em 0; background:#FFFFFF" | ||
| width="70px" | '''7020hd-key.pem''' | | width="70px" | '''7020hd-key.pem''' | ||
| − | | width="600px" | | + | | width="600px" | Key File. |
|- style="text-align:center; margin:1em 1em 1em 0; background:#FFFFFF" | |- style="text-align:center; margin:1em 1em 1em 0; background:#FFFFFF" | ||
| width="70px" | '''7020hd.ovpn''' | | width="70px" | '''7020hd.ovpn''' | ||
| − | | width="600px" | | + | | width="600px" | Configuration file for the client. |
| − | + | If multiple certificates for multiple clients are created, every name needs to be '''different'''. | |
|- style="text-align:center; margin:1em 1em 1em 0; background:#F0F0F0" | |- style="text-align:center; margin:1em 1em 1em 0; background:#F0F0F0" | ||
| width="70px" | '''vpn-ca.pem''' | | width="70px" | '''vpn-ca.pem''' | ||
| − | | width="600px" | | + | | width="600px" | The Root Certificate. |
|} | |} | ||
| + | == Overview of the configuration == | ||
| + | [[Bild:GP3 OpenVPN Konfigurationsuebersicht.png|thumb|none|Overview of the configuration|480px]] | ||
| − | + | The created configurations can be displayed with the '''[green]''' button (certificates) in the OpenVPN Server Plugin. The example shows the configuration for a root certificate, Server settings and the configuration of two clients, with the names htc and 7020hd. | |
| − | |||
| − | |||
| − | |||
| + | == Settings == | ||
| + | [[Bild:GP3 OpenVPN Einstellungen.png|thumb|none|OpenVPN settings|480px]] | ||
| − | + | Open the '''OpenVPN Server''' Plugin in the BluePanel under the daemons. Now we check first the settings, before starting the OpenVPN Server. Push the '''[blue]''' button and choose the point '''[Settings]'''. Use the following list for the descriptions and modify if requires. The network settings should be taken from the Dreambox and should '''only''' be changed in rare occasions. | |
| − | |||
| − | |||
| − | |||
| − | |||
| − | |||
| − | |||
{| border=1 style="text-align:center; margin:1em 1em 1em 0; background:#D0D0D0; border:1px #000000 solid; border-collapse:collapse; empty-cells:show;" CELLPADDING=2 CELLSPACING=0" | {| border=1 style="text-align:center; margin:1em 1em 1em 0; background:#D0D0D0; border:1px #000000 solid; border-collapse:collapse; empty-cells:show;" CELLPADDING=2 CELLSPACING=0" | ||
| − | | width="160px" | ''' | + | | width="160px" | '''Settings''' |
| − | | width="700px" | ''' | + | | width="700px" | '''Description''' |
|- style="text-align:center; margin:1em 1em 1em 0; background:#FFFFFF" | |- style="text-align:center; margin:1em 1em 1em 0; background:#FFFFFF" | ||
| − | | width="70px" | ''' | + | | width="70px" | '''Number of clients''' |
| − | | width="600px" | | + | | width="600px" | Amount of clients, which can connect with the OpenVPN Server. |
|- style="text-align:center; margin:1em 1em 1em 0; background:#FFFFFF" | |- style="text-align:center; margin:1em 1em 1em 0; background:#FFFFFF" | ||
| − | | width="70px" | ''' | + | | width="70px" | '''first client IP''' |
| − | | width="600px" | | + | | width="600px" | From this IP address on the IP's are assigned to the clients. '''Attention''' make sure this range is not overlapping with the dhcp server of the network! |
|- style="text-align:center; margin:1em 1em 1em 0; background:#F0F0F0" | |- style="text-align:center; margin:1em 1em 1em 0; background:#F0F0F0" | ||
| width="70px" | '''IP eth0''' | | width="70px" | '''IP eth0''' | ||
| − | | width="600px" | | + | | width="600px" | The IP Adress of the Dreambox for the lan interface (eth0). This address is only used for the network bridge (br0). |
| − | + | Keep in mind the local network card has no IP address in this mode, don't panic when checking the network adapter with '''ifconfig'''. | |
|- style="text-align:center; margin:1em 1em 1em 0; background:#F0F0F0" | |- style="text-align:center; margin:1em 1em 1em 0; background:#F0F0F0" | ||
| width="70px" | '''Netzmaske eth0''' | | width="70px" | '''Netzmaske eth0''' | ||
| − | | width="600px" | | + | | width="600px" | Enter the subnetmask of the local network. |
|- style="text-align:center; margin:1em 1em 1em 0; background:#F0F0F0" | |- style="text-align:center; margin:1em 1em 1em 0; background:#F0F0F0" | ||
| width="70px" | '''Broadcast eth0''' | | width="70px" | '''Broadcast eth0''' | ||
| − | | width="600px" | | + | | width="600px" | Enter the broadcast address of the local network. |
|- style="text-align:center; margin:1em 1em 1em 0; background:#F0F0F0" | |- style="text-align:center; margin:1em 1em 1em 0; background:#F0F0F0" | ||
| − | | width="70px" | '''IP | + | | width="70px" | '''IP Router Gateway''' |
| − | | width="600px" | | + | | width="600px" | Enter the IP address of the routers. |
|- style="text-align:center; margin:1em 1em 1em 0; background:#FFFFFF" | |- style="text-align:center; margin:1em 1em 1em 0; background:#FFFFFF" | ||
| − | | width="70px" | '''Log | + | | width="70px" | '''Log File''' |
| − | | width="600px" | | + | | width="600px" | Enable/disable the log file. When activated the log is in /var/log/openvpn.log |
|} | |} | ||
| − | + | Save the settings with the '''[green]''' button. After saving the settings the OpenVPN Server is started automatically. The OpenVPN Server will also be started automatically after restarting the Dreambox, when a configuration file and certificates are available. | |
| − | |||
| − | |||
| − | |||
| − | |||
| − | |||
| + | {{Hinweis|'''Restart the Dreambox'''<br/>The OpenVPN Server will also be started '''automatically''' after restarting the Dreambox, when a configuration file and certificates are available.}} | ||
| − | == OpenVPN | + | == OpenVPN Log File == |
| − | [[Bild:GP3 OpenVPN Logdatei.png|thumb|none| | + | [[Bild:GP3 OpenVPN Logdatei.png|thumb|none|Log file|620px]] |
| − | + | Informations about the status of the OpenVPN server can be displayed with the '''[red]''' button (Log file). The example shows the OpenVPN server was started successful with two connected clients. | |
| − | + | The log file can also be displayed in the terminal with the following command: | |
cat /var/log/openvpn.log | cat /var/log/openvpn.log | ||
| + | == Overview of connections == | ||
| + | [[Bild:GP3 OpenVPN Verbindungsuebersicht.png|thumb|none|Active connections|480px]] | ||
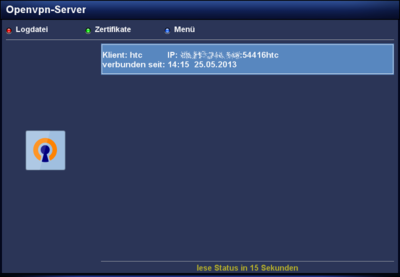
| − | + | The OpenVPN Server Plugin controls regularly if clients are connected and shows the connections as in the image '''Active connections'''. In this example two clients are connected, with the name htc and 7020hd. | |
| − | |||
| − | |||
| − | |||
| − | |||
| − | |||
| − | |||
| − | |||
| − | |||
| − | |||
| − | |||
| − | |||
| − | |||
| − | |||
| − | |||
| − | |||
| − | |||
| − | |||
| − | |||
| + | == Block certificate(s) == | ||
| + | [[Bild:GP3 OpenVPN Klient sperren.png|thumb|none|Expired certificate|480px]] | ||
| − | + | Certificates can be blocked, when you want to deny access from a client. Blocking is done over the '''[red]''' button, when the menu of the certificates is opened. Blocked client certificates are displayed as '''expired'''. For blocking the correct password (which was used for creating the root certificate) needs to be entered. | |
| + | {{Achtung|1='''Blocking certificates'''<br/>blocked certificates can '''not''' be reactivated. They need to be '''recreated'''!}} | ||
| − | == OpenVPN Server - | + | == OpenVPN Server - Menu button == |
| − | [[Bild:GP3 OpenVPN Server starten.png|thumb|none| | + | [[Bild:GP3 OpenVPN Server starten.png|thumb|none|Menu button|300px]] |
| − | + | Open the OpenVPN Server Plugin and push the '''[blue]''' button of the remote control. The functions are described in the following list. | |
{| border=1 style="text-align:center; margin:1em 1em 1em 0; background:#D0D0D0; border:1px #000000 solid; border-collapse:collapse; empty-cells:show;" CELLPADDING=2 CELLSPACING=0" | {| border=1 style="text-align:center; margin:1em 1em 1em 0; background:#D0D0D0; border:1px #000000 solid; border-collapse:collapse; empty-cells:show;" CELLPADDING=2 CELLSPACING=0" | ||
| − | | width="160px" | ''' | + | | width="160px" | '''Menu point''' |
| − | | width="700px" | ''' | + | | width="700px" | '''Description''' |
|- style="text-align:center; margin:1em 1em 1em 0; background:#FFFFFF" | |- style="text-align:center; margin:1em 1em 1em 0; background:#FFFFFF" | ||
| − | | width="70px" | ''' | + | | width="70px" | '''start / stop openvpn''' |
| − | | width="600px" | | + | | width="600px" | With this entry you can stop/start the OpenVPN server manually. |
|- style="text-align:center; margin:1em 1em 1em 0; background:#FFFFFF" | |- style="text-align:center; margin:1em 1em 1em 0; background:#FFFFFF" | ||
| − | | width="70px" | ''' | + | | width="70px" | '''show 'Routes'''' |
| − | | width="600px" | | + | | width="600px" | Shows [http://en.wikipedia.org/wiki/Routing Routing] informations of the network bridge (br0). |
|- style="text-align:center; margin:1em 1em 1em 0; background:#FFFFFF" | |- style="text-align:center; margin:1em 1em 1em 0; background:#FFFFFF" | ||
| − | | width="70px" | ''' | + | | width="70px" | '''Settings''' |
| − | | width="600px" | | + | | width="600px" | Settings for the OpenVPN server. |
|} | |} | ||
| − | + | == Delete certificates == | |
| − | + | Certificates can '''not''' be deleted in the OpenVPN Server Plugin. The files need to be deleted manually in the directory: | |
| − | |||
| − | == | ||
| − | |||
| − | |||
/etc/openvpn/ssl | /etc/openvpn/ssl | ||
| + | = OpenVPN Client = | ||
| + | There are many different [http://en.wikipedia.org/wiki/OpenVPN#Frontends OpenVPN Frontends], for different operation systems, to connect with a OpenVPN Server. The following points describe the configuration of the OpenVPN client on a Dreambox (with the GP3.2 Plugin) and an Android based Smartphone. | ||
| − | + | == Dreambox as client == | |
| − | + | When configuring the OpenVPN clients you need to copy the 4 files created on the server before in the directory of the client: | |
| − | |||
| − | |||
| − | |||
| − | |||
| − | |||
| − | |||
| − | == Dreambox | ||
| − | |||
| − | |||
/etc/openvpn | /etc/openvpn | ||
| − | + | Once more the list of the required 4 files for the OpenVPN client. The xxx stands for the name which was given for the client. | |
* xxx-cert.pem | * xxx-cert.pem | ||
| Zeile 283: | Zeile 223: | ||
* vpn-ca.pem | * vpn-ca.pem | ||
| − | + | === Edit configuration file === | |
| − | + | Before setting up a connection the configuration file (*.ovpn) needs to be edited. The line '''remote''' needs to be completed with the IP address or the host address and the correct port. the configuration could be similar to the example, when the access uses the host name webaccess.dyndns.tv via port 1194. | |
| − | |||
| − | |||
| − | === | ||
| − | |||
| − | |||
. | . | ||
| Zeile 304: | Zeile 239: | ||
. | . | ||
| + | === Make connection === | ||
| + | [[Bild:GP3 OpenVPN Klient Dreambox.png|thumb|none|Dreambox Client - Skin example: gp-skin-swan-black|480px]] | ||
| − | + | Open the '''OpenVPN Client''' Plugin in the BluePanel under Daemons. In the Plugin a line (not connected) appears, when the configuration files were copied in the correct directory (/etc/openvpn). | |
| + | Start the connection with the OpenVPN Server with the '''[OK]''' button. If everything starts the status '''connected''' is displayed in the OpenVPN Client Plugin. Disconnecting is possible by pressing the '''[OK]''' button again. | ||
| − | + | {{Hinweis|'''Connection after reboot'''<br/>The connection is restored '''automatically''' after a reboot of the Dreambox, if a config file (*.ovpn) is available in /etc/openvpn.}} | |
| − | |||
| − | + | == Android Smartphone as client == | |
| + | [[Bild:GP3 OpenVPN Klient Android.png|thumb|none|Example - OpenVPN settings Android|280px]] | ||
| − | + | The image shows an example of an Android based Smartphone, which is connected with the Dreambox. As App is used [http://code.google.com/p/android-openvpn-settings/ OpenVPN settings] to connect with the Server. Keep in mind the Smartphone needs to be rooted to use OpenVPN. Additional the tun/tap driver, the Busybox and [https://play.google.com/store/apps/details?id=de.schaeuffelhut.android.openvpn.installer&feature=related_apps#?t=W251bGwsMSwxLDEwOSwiZGUuc2NoYWV1ZmZlbGh1dC5hbmRyb2lkLm9wZW52cG4uaW5zdGFsbGVyIl0. OpenVPN] is required. With many [http://en.wikipedia.org/wiki/Custom-Rom Custom-Roms] these requirements are already integrated in the Firmware. | |
| − | + | The config file (*.opvn) needs to be edited with the correct server and port. Copy the client files on the SD card, e.g. in a directory openvpn. Now you need to adapt the OpenVPN App (e.g. path to the configuration, certificates) and the tunnel on the OpenVPN Server can be started. | |
| + | = Tips & Tricks = | ||
| + | == Flash new image == | ||
| + | Before flashing a new image with the OpenVPN Plugin you should save the content of 2 directories. Copy the content back in the new image when configuring the box again. You can copy manually, or use the software menu to save / restore the settings. | ||
| − | + | /etc/ssl/openvpn | |
| − | + | /etc/openvpn | |
| − | |||
| − | |||
| − | |||
| − | |||
| − | |||
| − | |||
| − | |||
| − | |||
| − | + | = Support thread = | |
| + | If you need help with OpenVPN, follow the link ;) | ||
| − | + | [http://www.i-have-a-dreambox.com/wbb2/thread.php?threadid=150114 geminiopenvpn (ihaD)] | |
| − | = | ||
| − | |||
| − | |||
| − | |||
| − | |||
| − | + | [[Kategorie:GP3 (en)]] | |
| − | |||
Aktuelle Version vom 17. Februar 2018, 18:52 Uhr
| This article is valid for Gemini plugin version GP 3.2 and GP 3.3 |
After installing the geminiopenvpn Plugin you have an OpenVPN Server or Client which is easy to configure. The plugin uses certificates (Server-Multi-Client). The connection on the OpenVPN Server is made over an encrypted TLS connection.
For connections the OpenVPN Server Plugin creates a virtual network interface (tap0), which is connected over a network bridge (br0) with the internal network adapter (eth0) of the Dreambox. One or more OpenVPN clients get an IP address of the internal network and can access all available services without additional routing.
The mode used by OpenVPN is Bridging. With this mode the Broadcasts are forwarded without any problem. Same for network protocols like IPv4, IPv6, Netalk, IPX, ...
Inhaltsverzeichnis
Requirements for using OpenVPN
- OE 2.0 or OE 2.2 image with GP3 Plugin.
- OpenVPN Plugin must be installed, configured and started.
- The OpenVPN Server supports only a cabled network (no Wlan).
- Portforwarding on the router to the Dreambox (Port 1194/UDP).
- For reaching the Server you need to know your WAN IP, or use a DDNS Service (e.g. No-IP).
- For access you need to create certificates for each client.
- OpenVPN needs to be installed on clients. Protocols like IPSec, IKE, PPTP, or L2TP are not supported.
- Server Lan and Client Lan must be different.
Installation / Deinstallation
The geminiopenvpn plugin can be installed / removed in different ways:
 see article: GP3 Addons - Category: Gemini Plugins
 see article: WebAdmin - Package name:
 geminiopenvpn see article: OPKG - Package name:
 geminiopenvpn
After the installation restart the Dreambox.
OpenVPN Server
Create Root Certificate
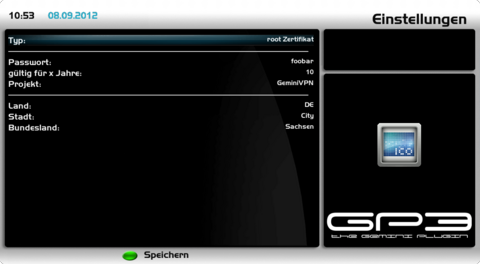
Now we create the keys and certificates for the Certificate Authority (CA). Open the OpenVPN Server Plugin and push the [green] button for certificates.
Choose root-certificate and change the settings as described in the list. For all parameters only letters and numbers can be used.
| Parameter | Description |
| Password | Enter a Password. Memorize the password, you will need the password for creating Server and Client certificates or for blocking a certificate. |
| valid for x years | Enter the validity period for the certificate in years. |
| Project | Enter a Project name for the certificate creation. |
| Country | Enter the country. |
| City | Enter the city. |
| State | Enter the state. |
Save the settings with the [green] button. The corresponding files will be created and saved in the directory /etc/ssl/openvpn.
Create Server Certificate
Open the OpenVPN Server Plugin and push the [green] button for certificates. Push again the [green] button and choose as type the setting Server and change the settings as described in the list.
| Parameter | Description |
| valid for x years | Enter the validity period for the certificate in years. |
Save the settings with the [green] button to create the certificates. You will be prompted to enter the password (which was entered while creating the root certificate). When a wrong password is entered the following error message is displayed: can't generate certificate.
When the correct password is entered the certificates, keys and the Diffie-Hellman parameters are created. This can take some minutes (up to 30 min), the status is displayed in the plugin. The plugin can be closed while the creation is in progress, the process continues in background.
Create Client Certificate(s)
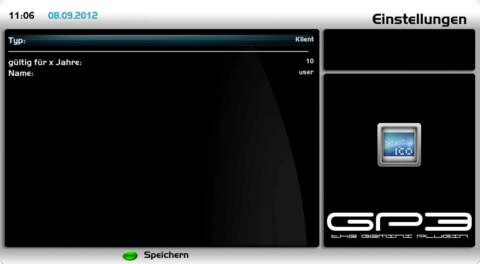
Open the OpenVPN Server Plugin and push the [green] button for certificates. Push again the [green] button and choose as type the setting Client and change the settings as described in the list.
| Parameters | Description |
| valid for x years | Enter the validity period for the certificate in years. |
| Name: | Desired name for the client.
If more client certificates are used, each must have a different name. |
Save the settings with the [green] button to create the certificates. You will be prompted to enter the password (which was entered while creating the root certificate). When a wrong password is entered the following error message is displayed: can't generate certificate.
When the correct password is entered the client certificate, key and configuration file can be found in the following directory:
/etc/ssl/openvpn
These files (three files for each client) will be used later on the OpenVPN clients to set up a connection with the server. The needed files look like follows, e.g. if the entered name was 7020hd. In addition to the three files every client needs the Root Certificate (vpn-ca.pem).
| File name | Description |
| 7020hd-cert.pem | Client Certificate. |
| 7020hd-key.pem | Key File. |
| 7020hd.ovpn | Configuration file for the client.
If multiple certificates for multiple clients are created, every name needs to be different. |
| vpn-ca.pem | The Root Certificate. |
Overview of the configuration
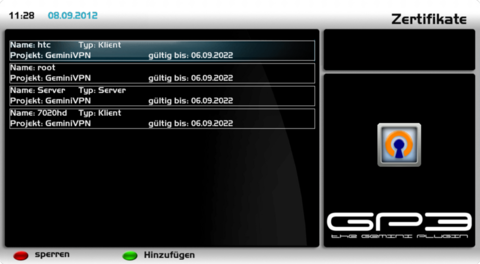
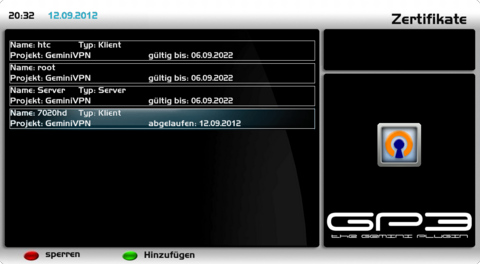
The created configurations can be displayed with the [green] button (certificates) in the OpenVPN Server Plugin. The example shows the configuration for a root certificate, Server settings and the configuration of two clients, with the names htc and 7020hd.
Settings
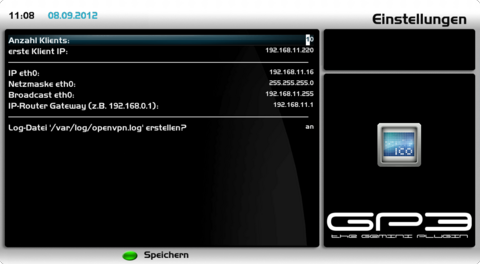
Open the OpenVPN Server Plugin in the BluePanel under the daemons. Now we check first the settings, before starting the OpenVPN Server. Push the [blue] button and choose the point [Settings]. Use the following list for the descriptions and modify if requires. The network settings should be taken from the Dreambox and should only be changed in rare occasions.
| Settings | Description |
| Number of clients | Amount of clients, which can connect with the OpenVPN Server. |
| first client IP | From this IP address on the IP's are assigned to the clients. Attention make sure this range is not overlapping with the dhcp server of the network! |
| IP eth0 | The IP Adress of the Dreambox for the lan interface (eth0). This address is only used for the network bridge (br0).
Keep in mind the local network card has no IP address in this mode, don't panic when checking the network adapter with ifconfig. |
| Netzmaske eth0 | Enter the subnetmask of the local network. |
| Broadcast eth0 | Enter the broadcast address of the local network. |
| IP Router Gateway | Enter the IP address of the routers. |
| Log File | Enable/disable the log file. When activated the log is in /var/log/openvpn.log |
Save the settings with the [green] button. After saving the settings the OpenVPN Server is started automatically. The OpenVPN Server will also be started automatically after restarting the Dreambox, when a configuration file and certificates are available.
| Restart the Dreambox The OpenVPN Server will also be started automatically after restarting the Dreambox, when a configuration file and certificates are available. |
OpenVPN Log File
Informations about the status of the OpenVPN server can be displayed with the [red] button (Log file). The example shows the OpenVPN server was started successful with two connected clients.
The log file can also be displayed in the terminal with the following command:
cat /var/log/openvpn.log
Overview of connections
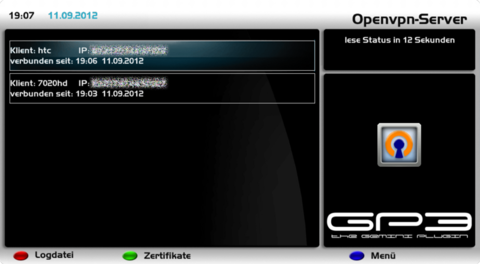
The OpenVPN Server Plugin controls regularly if clients are connected and shows the connections as in the image Active connections. In this example two clients are connected, with the name htc and 7020hd.
Block certificate(s)
Certificates can be blocked, when you want to deny access from a client. Blocking is done over the [red] button, when the menu of the certificates is opened. Blocked client certificates are displayed as expired. For blocking the correct password (which was used for creating the root certificate) needs to be entered.
| Blocking certificates blocked certificates can not be reactivated. They need to be recreated! |
OpenVPN Server - Menu button
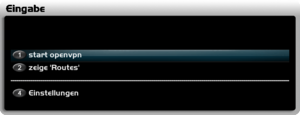
Open the OpenVPN Server Plugin and push the [blue] button of the remote control. The functions are described in the following list.
| Menu point | Description |
| start / stop openvpn | With this entry you can stop/start the OpenVPN server manually. |
| show 'Routes' | Shows Routing informations of the network bridge (br0). |
| Settings | Settings for the OpenVPN server. |
Delete certificates
Certificates can not be deleted in the OpenVPN Server Plugin. The files need to be deleted manually in the directory:
/etc/openvpn/ssl
OpenVPN Client
There are many different OpenVPN Frontends, for different operation systems, to connect with a OpenVPN Server. The following points describe the configuration of the OpenVPN client on a Dreambox (with the GP3.2 Plugin) and an Android based Smartphone.
Dreambox as client
When configuring the OpenVPN clients you need to copy the 4 files created on the server before in the directory of the client:
/etc/openvpn
Once more the list of the required 4 files for the OpenVPN client. The xxx stands for the name which was given for the client.
- xxx-cert.pem
- xxx.pem
- xxx.ovpn
- vpn-ca.pem
Edit configuration file
Before setting up a connection the configuration file (*.ovpn) needs to be edited. The line remote needs to be completed with the IP address or the host address and the correct port. the configuration could be similar to the example, when the access uses the host name webaccess.dyndns.tv via port 1194.
.
.
# example 'remote foobar.org 1194'
# example 'remote 97.123.100.236 1194'
remote webaccess.dyndns.tv 1194

resolv-retry infinite
nobind
persist-key
persist-tun
.
.
Make connection
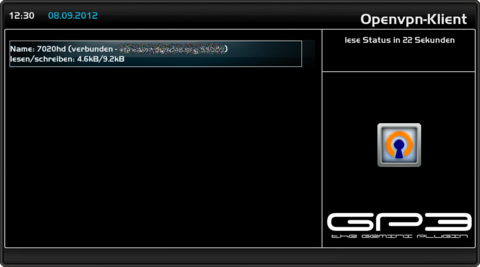
Open the OpenVPN Client Plugin in the BluePanel under Daemons. In the Plugin a line (not connected) appears, when the configuration files were copied in the correct directory (/etc/openvpn).
Start the connection with the OpenVPN Server with the [OK] button. If everything starts the status connected is displayed in the OpenVPN Client Plugin. Disconnecting is possible by pressing the [OK] button again.
| Connection after reboot The connection is restored automatically after a reboot of the Dreambox, if a config file (*.ovpn) is available in /etc/openvpn. |
Android Smartphone as client
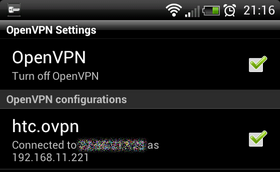
The image shows an example of an Android based Smartphone, which is connected with the Dreambox. As App is used OpenVPN settings to connect with the Server. Keep in mind the Smartphone needs to be rooted to use OpenVPN. Additional the tun/tap driver, the Busybox and OpenVPN is required. With many Custom-Roms these requirements are already integrated in the Firmware.
The config file (*.opvn) needs to be edited with the correct server and port. Copy the client files on the SD card, e.g. in a directory openvpn. Now you need to adapt the OpenVPN App (e.g. path to the configuration, certificates) and the tunnel on the OpenVPN Server can be started.
Tips & Tricks
Flash new image
Before flashing a new image with the OpenVPN Plugin you should save the content of 2 directories. Copy the content back in the new image when configuring the box again. You can copy manually, or use the software menu to save / restore the settings.
/etc/ssl/openvpn
/etc/openvpn
Support thread
If you need help with OpenVPN, follow the link ;)
