Automount (en): Unterschied zwischen den Versionen
Mfgeg (Diskussion | Beiträge) |
|||
| (34 dazwischenliegende Versionen von 2 Benutzern werden nicht angezeigt) | |||
| Zeile 3: | Zeile 3: | ||
|[[Bild:english.png]] - [[Automount (en)|in English]] | |[[Bild:english.png]] - [[Automount (en)|in English]] | ||
|} | |} | ||
| − | The '''Automounter''' is a service (consisting of automount/autofs), to mount file systems automatically. Mounting is | + | The '''Automounter''' is a service (consisting of automount/autofs), to mount file systems automatically. Mounting is performed when accessing the configured directories. Unmounting is performed by default after 5 sec. of inactivity (depending on the used image). On Dreamboxes the service is used to access network shares. The shares can be accessed over cifs and/or nfs. |
| − | After mounting the share it's possible to play supported movies, music and images. The network shares can be on [http://en.wikipedia.org/wiki/Dreambox Dreamboxes], [http://en.wikipedia.org/wiki/Linux | + | After mounting the share it's possible to play supported movies, music and images. The network shares can be on [http://en.wikipedia.org/wiki/Dreambox Dreamboxes], [http://en.wikipedia.org/wiki/Linux Linux computers], [http://en.wikipedia.org/wiki/Macintosh Macs], [http://en.wikipedia.org/wiki/Network-attached_storage NAS] and [http://en.wikipedia.org/wiki/Microsoft_Windows Windows computers]. |
Advantage of the automounter: no scripts, editing of the fstab or boot settings are required. | Advantage of the automounter: no scripts, editing of the fstab or boot settings are required. | ||
| Zeile 16: | Zeile 16: | ||
== Prerequisites == | == Prerequisites == | ||
| − | *Knowing the ''' | + | *Knowing the '''Blue Panel''' (Automount - Editor) and the '''remote control''' |
*Editing the '''configuration file''' with an '''unix compatible editor''' | *Editing the '''configuration file''' with an '''unix compatible editor''' | ||
| − | == | + | == Configuring the Automounter == |
| − | + | There are 3 ways to configure the automounter. | |
| − | * | + | *The '''[[Automount_(en)#Configuration_via_Automount_Editor|Automount Editor]]''' of the BluePanel |
| − | * | + | *Or editing the '''[[Automount_(en)#Configuration_via_configuration_file|configuration file]]''' |
| − | * | + | *With the GP3 Plugin and the installed '''[[GP3 Netscan (en)|Netscan]]''' Plugin, Samba and NFS shares can be found and passed to the Automount Editor. |
| − | === | + | === Configuration via Automount Editor === |
| − | + | The '''Automount Editor''' is available in [[Enigma_1 (en)|Enigma]] since '''Gemini Project 1.9''' and in [[Enigma2 (en)|Enigma2]] since '''Gemini Project 3.2''' in the Blue Panel. | |
| − | * | + | *With Enigma (since version 4.5) the Automount-Editor can be found in the Blue Panel under '''Extras / Settings => Automount''' |
| − | * | + | *With Enigma2 (since version 4.1) under '''Settings => Automount Editor''' |
| − | * | + | *With the installed GP3 Plugin under Blue Panel => Settings => [[GP3_Settings_Automount_(en)|Automount Editor]] |
| − | {{Hinweis| | + | {{Hinweis|After configuring the mount point, the box or the autofs Daemon needs to be restarted. When using the Automount Editor of the GP3 Plugin, this is no longer required. After closing the editor, autofs is restarted automatically.}} |
| − | ==== | + | ==== Example CIFS Mount ==== |
| − | + | Example of a cifs mount. <br/> | |
| − | + | The settings need to be changed according to your situation. | |
{| | {| | ||
|[[Bild:Cifs mount gp3.png|Automount Editor GP3 Plugin|thumb|none|400px]] | |[[Bild:Cifs mount gp3.png|Automount Editor GP3 Plugin|thumb|none|400px]] | ||
| Zeile 44: | Zeile 44: | ||
|} | |} | ||
| − | ===== | + | ===== description of the settings ===== |
<div style="background-color: #eeeeee; border: 0px padding: .4em; solid #cccccc;"> | <div style="background-color: #eeeeee; border: 0px padding: .4em; solid #cccccc;"> | ||
'''Name'''<br/> | '''Name'''<br/> | ||
| − | + | Enter the name of the device (e.g. sound). The autofs daemon creates a '''directory''' with the selected name.<br/> | |
| − | + | The path of the directory is saved in the file auto.master.<br/> | |
| − | + | Read: [[Automount_(en)#Accessing_the_mount_point|Accessing the mount point]]. | |
| − | + | Attention: if using multiple mounts, the name (mount point) should '''always''' be different. | |
'''Typ'''<br/> | '''Typ'''<br/> | ||
| − | + | selection of the protocol [http://en.wikipedia.org/wiki/Server_Message_Block CIFS]. | |
'''Parameter'''<br/> | '''Parameter'''<br/> | ||
| − | + | Options for the mount. | |
'''Server'''<br/> | '''Server'''<br/> | ||
| − | IP | + | IP address of the source device. |
| − | ''' | + | '''Share'''<br/> |
| − | + | Enter the name of the shared directory.<br/> | |
| − | ''' | + | '''Attention, with Enigma2 there shouldn't be a / (Slash) entered at the beginning!''' |
| − | ''' | + | '''read / write buffer'''<br/> |
| − | + | The options '''rsize''' and '''wsize''' define the size of the data packages, which are exchanged by the client and server. | |
| − | ''' | + | '''User'''<br/> |
| − | + | Enter the user name of for the access on the source device. | |
| − | ''' | + | '''Password'''<br/> |
| − | + | Enter the password for the access on the source device. | |
'''Charset (utf8)'''<br/> | '''Charset (utf8)'''<br/> | ||
| − | + | Sets the [http://en.wikipedia.org/wiki/Character_encoding character encoding] onto utf8, useful for special characters. | |
</div> | </div> | ||
| − | ==== | + | ==== Example NFS Mount ==== |
| − | + | Example of a nfs mount. <br/> | |
| − | + | The settings need to be changed according to your situation. | |
{| | {| | ||
|[[Bild:Nfs mount gp3.png|Automount Editor GP3 Plugin|thumb|none|400px]] | |[[Bild:Nfs mount gp3.png|Automount Editor GP3 Plugin|thumb|none|400px]] | ||
| Zeile 88: | Zeile 88: | ||
|} | |} | ||
| − | ===== | + | ===== description of the settings ===== |
<div style="background-color: #eeeeee; border: 0px padding: .4em; solid #cccccc;"> | <div style="background-color: #eeeeee; border: 0px padding: .4em; solid #cccccc;"> | ||
'''Name'''<br/> | '''Name'''<br/> | ||
| − | + | Enter the name of the device (e.g. sound). The autofs daemon creates a '''directory''' with the selected name.<br/> | |
| − | + | The path of the directory is saved in the file auto.master.<br/> | |
| − | + | Read: [[Automount_(en)#Accessing_the_mount_point|Accessing the mount point]]. | |
| − | + | Attention: if using multiple mounts, the name (mount point) should '''always''' be different. | |
'''Typ'''<br/> | '''Typ'''<br/> | ||
| − | + | selection of the protocol [http://en.wikipedia.org/wiki/Network_File_System NFS]. | |
'''Parameter'''<br/> | '''Parameter'''<br/> | ||
| − | + | Options for the mount. | |
'''Server'''<br/> | '''Server'''<br/> | ||
| − | IP | + | IP address of the source device. |
| − | ''' | + | '''Share'''<br/> |
| − | + | Enter the name of the shared directory.<br/> | |
| − | ''' | + | '''Attention, with Enigma2 there shouldn't be a / (Slash) entered at the beginning!''' |
| + | |||
| + | '''read / write buffer'''<br/> | ||
| + | The options '''rsize''' and '''wsize''' define the size of the data packages, which are exchanged by the client and server. | ||
| − | |||
| − | |||
</div> | </div> | ||
| − | ==== | + | ==== Accessing the mount point ==== |
| − | + | The access of the created mount point depends on the Gemini version. The easiest way is to use the File Mode (Enigma), or the File Manager (Enigma2). | |
| + | |||
| + | *For Enigma boxes the mount point can be found in the directory '''/automount'''. | ||
| + | |||
| + | *For Enigma2 up to '''GP version 3.8''' the mount point is in '''/automount'''. From version '''3.9''' till '''4.1''' it can be found in '''/autofs'''. And from '''GP2 4.2''' until '''GP3.2''' in '''/media/net'''. | ||
| − | * | + | *Since Gemini Project 3.3 for [[OE 2.2 (en)|OE 2.2]] the mount points are in '''/media/network'''. |
| − | + | === Configuration via configuration file === | |
| + | The configuration file of the automounter for CVS Boxes can be found in /var/etc and for OE Boxes in /etc (CVS/OE Boxes see [http://wiki.blue-panel.com/index.php/CVS_/_OE_-_Image_(en) here]). Here you can find also the different files depending on the image version. The syntax remained the same. | ||
| − | + | *With Enigma the file name is '''automount.conf'''. The configuration is possible since '''Gemini Project 3.1'''. | |
| − | |||
| − | * | + | *With Enigma2 the file name is '''automount.conf''' for '''Gemini Project 1.8 - 3.8'''. Since version '''3.9 - 4.1''' the file name is '''auto.hotplug'''. And from version '''4.2''' until '''GP 3.2'''the name is '''auto.network'''. |
| − | * | + | *Since Gemini Project 3.3 for [[OE 2.2 (en)|OE 2.2]] the file name is [[auto.gemini]]. |
| − | {{Hinweis| | + | {{Hinweis|The permissions with [[OE 2.0 (en)|OE 2.0]] / [[OE 2.2 (en)|OE 2.2]] images should be '''644'''. The file shouldn't be executable! You can change the permission with the command '''chmod 644 /etc/auto.network'''.}} |
| − | {{Hinweis| | + | {{Hinweis|After the creation of a mount point, the Box or the autofs daemon should be restarted.}} |
| − | ==== | + | ==== Example CIFS mount ==== |
| − | + | Example of a cifs mount. <br/> | |
| − | + | The settings need to be changed according to your situation. | |
sound -fstype=cifs,rw,soft,rsize=8192,wsize=8192,iocharset=utf8,user=Benutzername,pass=Passwort ://192.168.1.10/sound | sound -fstype=cifs,rw,soft,rsize=8192,wsize=8192,iocharset=utf8,user=Benutzername,pass=Passwort ://192.168.1.10/sound | ||
| − | ===== | + | ===== description of the settings ===== |
<div style="background-color: #eeeeee; border: 0px padding: .4em; solid #cccccc;"> | <div style="background-color: #eeeeee; border: 0px padding: .4em; solid #cccccc;"> | ||
| − | ''' | + | '''Name'''<br/> |
| − | + | Enter the name of the device (e.g. sound). The autofs daemon creates a '''directory''' with the selected name.<br/> | |
| − | + | The path of the directory is saved in the file auto.master.<br/> | |
| − | + | Read: [[Automount_(en)#Accessing_the_mount_point_2|Accessing the mount point]]. | |
| − | + | Attention: if using multiple mounts, the name (mount point) should '''always''' be different. | |
'''-fstype='''<br/> | '''-fstype='''<br/> | ||
| − | + | selection of the protocol [http://en.wikipedia.org/wiki/Server_Message_Block CIFS]. | |
'''rw,soft'''<br/> | '''rw,soft'''<br/> | ||
| − | + | Options for the mount. | |
| − | '''user= | + | '''user=user_name'''<br/> |
| − | + | Enter the user name of for the access on the source device. | |
| − | '''pass= | + | '''pass=password'''<br/> |
| − | + | Enter the password for the access on the source device. | |
'''rsize=8192,wsize=8192'''<br/> | '''rsize=8192,wsize=8192'''<br/> | ||
| − | + | The options '''rsize''' and '''wsize''' define the size of the data packages, which are exchanged by the client and server. | |
'''iocharset=utf8'''<br/> | '''iocharset=utf8'''<br/> | ||
| − | + | Sets the [http://en.wikipedia.org/wiki/Character_encoding character encoding] onto utf8, useful for special characters. | |
'''://192.168.1.10'''<br/> | '''://192.168.1.10'''<br/> | ||
| − | IP | + | IP address of the source device. |
'''/sound'''<br/> | '''/sound'''<br/> | ||
| − | + | Enter the name of the shared directory.<br/> | |
| + | '''Attention, with Enigma2 there shouldn't be a / (Slash) entered at the beginning!''' | ||
</div> | </div> | ||
| − | ==== | + | ==== Example NFS mount ==== |
| − | + | Example of a nfs mount. <br/> | |
| − | + | The settings need to be changed according to your situation. | |
| − | video -fstype=nfs,rw,soft,tcp,nolock,rsize=8192,wsize=8192 192.168.1.15:/video | + | video -fstype=nfs,rw,soft,tcp,nolock,retry=0,rsize=8192,wsize=8192 192.168.1.15:/video |
| − | ===== | + | ===== description of the settings ===== |
<div style="background-color: #eeeeee; border: 0px padding: .4em; solid #cccccc;"> | <div style="background-color: #eeeeee; border: 0px padding: .4em; solid #cccccc;"> | ||
| − | ''' | + | '''Name'''<br/> |
| − | + | Enter the name of the device (e.g. sound). The autofs daemon creates a '''directory''' with the selected name.<br/> | |
| − | + | The path of the directory is saved in the file auto.master.<br/> | |
| − | + | Read: [[Automount_(en)#Accessing_the_mount_point|Accessing the mount point]]. | |
| − | + | Attention: if using multiple mounts, the name (mount point) should '''always''' be different. | |
'''-fstype='''<br/> | '''-fstype='''<br/> | ||
| − | + | selection of the protocol [http://en.wikipedia.org/wiki/Network_File_System NFS]. | |
'''rw,soft,tcp,nolock'''<br/> | '''rw,soft,tcp,nolock'''<br/> | ||
| − | + | Options for the mount. | |
'''rsize=8192,wsize=8192'''<br/> | '''rsize=8192,wsize=8192'''<br/> | ||
| − | + | The options '''rsize''' and '''wsize''' define the size of the data packages, which are exchanged by the client and server. | |
'''192.168.1.15:'''<br/> | '''192.168.1.15:'''<br/> | ||
| − | IP | + | IP address of the source device. |
'''/video'''<br/> | '''/video'''<br/> | ||
| − | + | Enter the name of the shared directory.<br/> | |
| + | '''Attention, with Enigma2 there shouldn't be a / (Slash) entered at the beginning!''' | ||
| + | |||
</div> | </div> | ||
| − | ==== | + | ==== Accessing the mount point ==== |
| − | + | The access of the created mount point depends on the Gemini version. The easiest way is to use the File Mode (Enigma), or the File Manager (Enigma2). | |
| + | |||
| + | *For Enigma boxes the mount point can be found in the directory '''/automount'''. | ||
| + | |||
| + | *For Enigma2 up to '''GP version 3.8''' the mount point is in '''/automount'''. From version '''3.9''' till '''4.1''' it can be found in '''/autofs'''. And from '''4.2''' until '''GP 3.2''' in '''/media/net'''. | ||
| − | * | + | *Since '''GP3 3.3''' for [[OE 2.2 (en)|OE 2.2]] in '''/media/network'''. |
| − | |||
| − | == | + | == Interesting shell commands for the automounter == |
| − | {{Hinweis| | + | {{Hinweis|With Enigma the automounter offers the options <nowiki>{start|stop|restart}</nowiki>. The script has the name '''autofs_script.sh''' }} |
| − | === | + | ===Examples for an Enigma2 based Dreambox up to OE 2.0 === |
| − | ==== | + | ==== Stop autofs ==== |
<syntaxhighlight> | <syntaxhighlight> | ||
/etc/init.d/autofs stop | /etc/init.d/autofs stop | ||
</syntaxhighlight> | </syntaxhighlight> | ||
| − | ==== | + | ==== Start autofs ==== |
<syntaxhighlight> | <syntaxhighlight> | ||
/etc/init.d/autofs start | /etc/init.d/autofs start | ||
</syntaxhighlight> | </syntaxhighlight> | ||
| − | ==== | + | ==== Restart autofs ==== |
<syntaxhighlight> | <syntaxhighlight> | ||
/etc/init.d/autofs restart | /etc/init.d/autofs restart | ||
</syntaxhighlight> | </syntaxhighlight> | ||
| − | ==== | + | ==== Load the changed config file ==== |
<syntaxhighlight> | <syntaxhighlight> | ||
/etc/init.d/autofs reload | /etc/init.d/autofs reload | ||
</syntaxhighlight> | </syntaxhighlight> | ||
| − | ==== Status | + | ==== Status query ==== |
<syntaxhighlight> | <syntaxhighlight> | ||
/etc/init.d/autofs status | /etc/init.d/autofs status | ||
</syntaxhighlight> | </syntaxhighlight> | ||
| − | == | + | ===Examples for an Enigma2 based Dreambox since OE 2.2=== |
| − | + | ==== Stop autofs ==== | |
| − | + | <syntaxhighlight> | |
| − | + | systemctl stop autofs | |
| − | + | </syntaxhighlight> | |
| − | + | ==== Start autofs ==== | |
| + | <syntaxhighlight> | ||
| + | systemctl start autofs | ||
| + | </syntaxhighlight> | ||
| + | ==== Show status of autofs ==== | ||
| + | <syntaxhighlight> | ||
| + | systemctl status autofs | ||
| + | </syntaxhighlight> | ||
| − | [[Kategorie: | + | [[Kategorie:Basics (en)]] |
| − | [[Kategorie: | + | [[Kategorie:Instructions (en)]] |
| − | [[Kategorie: | + | [[Kategorie:Network (en)]] |
Aktuelle Version vom 12. November 2016, 20:48 Uhr
The Automounter is a service (consisting of automount/autofs), to mount file systems automatically. Mounting is performed when accessing the configured directories. Unmounting is performed by default after 5 sec. of inactivity (depending on the used image). On Dreamboxes the service is used to access network shares. The shares can be accessed over cifs and/or nfs.
After mounting the share it's possible to play supported movies, music and images. The network shares can be on Dreamboxes, Linux computers, Macs, NAS and Windows computers.
Advantage of the automounter: no scripts, editing of the fstab or boot settings are required.
Inhaltsverzeichnis
Functionality Automounter
For the preamble Automount Mounter, two files are important, autofs and automount. Autofs defines the mount points using the auto.master file. Afterwards the mounting is performed by automount.
Goal of the article
- Learn the configuration of the Auto Mounter
Prerequisites
- Knowing the Blue Panel (Automount - Editor) and the remote control
- Editing the configuration file with an unix compatible editor
Configuring the Automounter
There are 3 ways to configure the automounter.
- The Automount Editor of the BluePanel
- Or editing the configuration file
- With the GP3 Plugin and the installed Netscan Plugin, Samba and NFS shares can be found and passed to the Automount Editor.
Configuration via Automount Editor
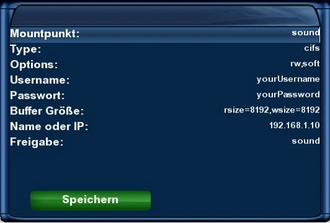
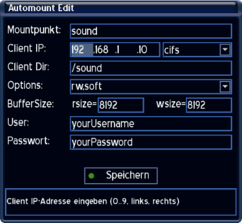
The Automount Editor is available in Enigma since Gemini Project 1.9 and in Enigma2 since Gemini Project 3.2 in the Blue Panel.
- With Enigma (since version 4.5) the Automount-Editor can be found in the Blue Panel under Extras / Settings => Automount
- With Enigma2 (since version 4.1) under Settings => Automount Editor
- With the installed GP3 Plugin under Blue Panel => Settings => Automount Editor
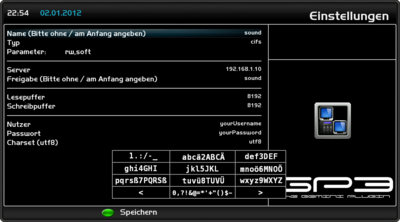
Example CIFS Mount
Example of a cifs mount.
The settings need to be changed according to your situation.
description of the settings
Name
Enter the name of the device (e.g. sound). The autofs daemon creates a directory with the selected name.
The path of the directory is saved in the file auto.master.
Read: Accessing the mount point.
Attention: if using multiple mounts, the name (mount point) should always be different.
Typ
selection of the protocol CIFS.
Parameter
Options for the mount.
Server
IP address of the source device.
Share
Enter the name of the shared directory.
Attention, with Enigma2 there shouldn't be a / (Slash) entered at the beginning!
read / write buffer
The options rsize and wsize define the size of the data packages, which are exchanged by the client and server.
User
Enter the user name of for the access on the source device.
Password
Enter the password for the access on the source device.
Charset (utf8)
Sets the character encoding onto utf8, useful for special characters.
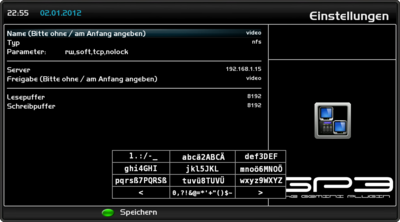
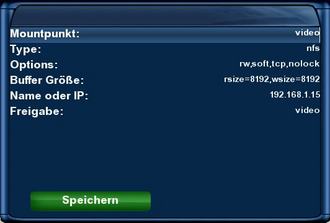
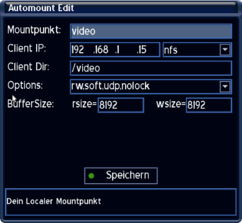
Example NFS Mount
Example of a nfs mount.
The settings need to be changed according to your situation.
description of the settings
Name
Enter the name of the device (e.g. sound). The autofs daemon creates a directory with the selected name.
The path of the directory is saved in the file auto.master.
Read: Accessing the mount point.
Attention: if using multiple mounts, the name (mount point) should always be different.
Typ
selection of the protocol NFS.
Parameter
Options for the mount.
Server
IP address of the source device.
Share
Enter the name of the shared directory.
Attention, with Enigma2 there shouldn't be a / (Slash) entered at the beginning!
read / write buffer
The options rsize and wsize define the size of the data packages, which are exchanged by the client and server.
Accessing the mount point
The access of the created mount point depends on the Gemini version. The easiest way is to use the File Mode (Enigma), or the File Manager (Enigma2).
- For Enigma boxes the mount point can be found in the directory /automount.
- For Enigma2 up to GP version 3.8 the mount point is in /automount. From version 3.9 till 4.1 it can be found in /autofs. And from GP2 4.2 until GP3.2 in /media/net.
- Since Gemini Project 3.3 for OE 2.2 the mount points are in /media/network.
Configuration via configuration file
The configuration file of the automounter for CVS Boxes can be found in /var/etc and for OE Boxes in /etc (CVS/OE Boxes see here). Here you can find also the different files depending on the image version. The syntax remained the same.
- With Enigma the file name is automount.conf. The configuration is possible since Gemini Project 3.1.
- With Enigma2 the file name is automount.conf for Gemini Project 1.8 - 3.8. Since version 3.9 - 4.1 the file name is auto.hotplug. And from version 4.2 until GP 3.2the name is auto.network.
- Since Gemini Project 3.3 for OE 2.2 the file name is auto.gemini.
| The permissions with OE 2.0 / OE 2.2 images should be 644. The file shouldn't be executable! You can change the permission with the command chmod 644 /etc/auto.network. |
| After the creation of a mount point, the Box or the autofs daemon should be restarted. |
Example CIFS mount
Example of a cifs mount.
The settings need to be changed according to your situation.
sound -fstype=cifs,rw,soft,rsize=8192,wsize=8192,iocharset=utf8,user=Benutzername,pass=Passwort ://192.168.1.10/sound
description of the settings
Name
Enter the name of the device (e.g. sound). The autofs daemon creates a directory with the selected name.
The path of the directory is saved in the file auto.master.
Read: Accessing the mount point.
Attention: if using multiple mounts, the name (mount point) should always be different.
-fstype=
selection of the protocol CIFS.
rw,soft
Options for the mount.
user=user_name
Enter the user name of for the access on the source device.
pass=password
Enter the password for the access on the source device.
rsize=8192,wsize=8192
The options rsize and wsize define the size of the data packages, which are exchanged by the client and server.
iocharset=utf8
Sets the character encoding onto utf8, useful for special characters.
://192.168.1.10
IP address of the source device.
/sound
Enter the name of the shared directory.
Attention, with Enigma2 there shouldn't be a / (Slash) entered at the beginning!
Example NFS mount
Example of a nfs mount.
The settings need to be changed according to your situation.
video -fstype=nfs,rw,soft,tcp,nolock,retry=0,rsize=8192,wsize=8192 192.168.1.15:/video
description of the settings
Name
Enter the name of the device (e.g. sound). The autofs daemon creates a directory with the selected name.
The path of the directory is saved in the file auto.master.
Read: Accessing the mount point.
Attention: if using multiple mounts, the name (mount point) should always be different.
-fstype=
selection of the protocol NFS.
rw,soft,tcp,nolock
Options for the mount.
rsize=8192,wsize=8192
The options rsize and wsize define the size of the data packages, which are exchanged by the client and server.
192.168.1.15:
IP address of the source device.
/video
Enter the name of the shared directory.
Attention, with Enigma2 there shouldn't be a / (Slash) entered at the beginning!
Accessing the mount point
The access of the created mount point depends on the Gemini version. The easiest way is to use the File Mode (Enigma), or the File Manager (Enigma2).
- For Enigma boxes the mount point can be found in the directory /automount.
- For Enigma2 up to GP version 3.8 the mount point is in /automount. From version 3.9 till 4.1 it can be found in /autofs. And from 4.2 until GP 3.2 in /media/net.
- Since GP3 3.3 for OE 2.2 in /media/network.
Interesting shell commands for the automounter
| With Enigma the automounter offers the options {start|stop|restart}. The script has the name autofs_script.sh |
Examples for an Enigma2 based Dreambox up to OE 2.0
Stop autofs
/etc/init.d/autofs stop
Start autofs
/etc/init.d/autofs start
Restart autofs
/etc/init.d/autofs restart
Load the changed config file
/etc/init.d/autofs reload
Status query
/etc/init.d/autofs status
Examples for an Enigma2 based Dreambox since OE 2.2
Stop autofs
systemctl stop autofs
Start autofs
systemctl start autofs
Show status of autofs
systemctl status autofs
