FTP setup (en): Unterschied zwischen den Versionen
(Zwischenspeicherung) |
Mfgeg (Diskussion | Beiträge) |
||
| (5 dazwischenliegende Versionen von 2 Benutzern werden nicht angezeigt) | |||
| Zeile 3: | Zeile 3: | ||
|[[Bild:english.png]] - [[FTP setup (en)|in English]] | |[[Bild:english.png]] - [[FTP setup (en)|in English]] | ||
|} | |} | ||
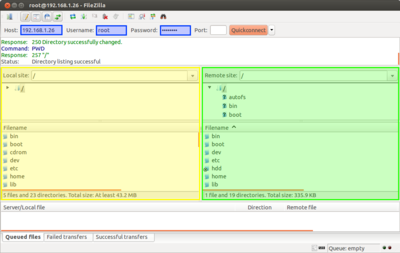
| − | [[Datei:FTP | + | [[Datei:FTP setup (en).png|thumb|400px|FileZilla in action]] |
This article is a guide for a FTP connection using [http://en.wikipedia.org/wiki/FileZilla FileZilla]. Before you start, please read the following article as well. | This article is a guide for a FTP connection using [http://en.wikipedia.org/wiki/FileZilla FileZilla]. Before you start, please read the following article as well. | ||
| − | {{Hauptbeitrag (en)|FTP_(en)|}} | + | {{Hauptbeitrag (en)|FTP_(en){{!}}FTP|}} |
You should gather the following information beforehand: | You should gather the following information beforehand: | ||
| Zeile 26: | Zeile 26: | ||
== Storing the connection == | == Storing the connection == | ||
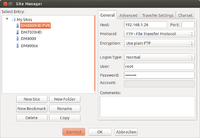
| − | [[Datei:FileZilla | + | [[Datei:FileZilla Site Manager (en).png|thumb|200px|Site Manager]] |
| − | You can save the information of the active connection by storing a profile in the | + | You can save the information of the active connection by storing a profile in the Site Manager. This way you can easily access your Dreambox without entering the informations over and over again. Of course it is also possible to store the profile beforehand and connect afterwards. |
# Connect to the Dreambox | # Connect to the Dreambox | ||
# Open menu [File] | # Open menu [File] | ||
| − | # | + | # Choose [Copy current connection to Site Manager...] |
| − | # | + | # Enter a name for the profile |
| − | # | + | # Store the Information by pressing {{Taste|OK}} |
| − | + | If you start FileZilla again, you can choose one of the stored profiles by clicking on the icon [Site Manager] and then on the profile you want to use to connect to your Dreambox via FTP, press the button {{Taste|Connect}}. | |
| − | == | + | == Set the default path of the Dreambox == |
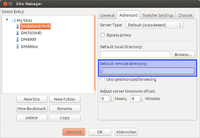
| − | [[Datei:FileZilla | + | [[Datei:FileZilla default directory (en).png|thumb|200px|Default path Dreambox]] |
| − | + | One can define the default path which should be displayed when connecting to the Dreambox via FTP. This is helpfull, because [[OE 2.0]] introduced a small change by using the home directory (<code>/home/root</code>) as default path instead of the [http://en.wikipedia.org/wiki/Root_directory root directory] (<code>/</code>) as before. | |
| − | # FileZilla | + | # Start FileZilla |
| − | # | + | # Open Site Manager |
| − | # | + | # Choose a profile |
| − | # | + | # Click on register [Advanced] |
| − | # | + | # Enter the path in entry field [Default remote directory], e.g. / |
| − | # | + | # Store the Information by pressing {{Taste|OK}} |
| − | + | You can test the new default path by establishing a new connection to the Dreambox using the stored profile. | |
== Screencast == | == Screencast == | ||
| − | + | Please have a look at '''[http://www.youtube.com/watch?v=Ta_ezoUrxkw&list=UUyWXuSlsR2ED6HbMhTMw-Tw&index=43 Episode 2]''' of Dreamscreencast as well, if you don't mind that this is in german. | |
| − | {{Hauptbeitrag|Dreamscreencast|}} | + | {{Hauptbeitrag (en)|Dreamscreencast|(german only)}} |
| − | [[Kategorie: | + | [[Kategorie:Network (en)]] |
| − | |||
Aktuelle Version vom 12. November 2016, 18:02 Uhr
This article is a guide for a FTP connection using FileZilla. Before you start, please read the following article as well.
 see article: FTP
You should gather the following information beforehand:
- IP address, which can be found in the network settings of the Dreambox
- Username is
rootby default - Password of root, if there is one at all
For our example, the IP address of the Dreambox is 192.168.1.26, username is root and the password is a secret (:D.
Inhaltsverzeichnis
Establish a connection
- Start FileZilla
- Entryfield [Server:] has to contain the IP address of the Dreambox
- Entryfield [Benutzername:] has to contain root
- Entryfield [Passwort] has to contain the password of user root (if there is a password for root at all)
- The FTP connection will be established by pressing the button Quickconnect
If the connection attempt was successful, one can transfer files via Drag and Drop between the local computer (left side) and the Dreambox (right side). Through the context menu several additional functions are available.
Storing the connection
You can save the information of the active connection by storing a profile in the Site Manager. This way you can easily access your Dreambox without entering the informations over and over again. Of course it is also possible to store the profile beforehand and connect afterwards.
- Connect to the Dreambox
- Open menu [File]
- Choose [Copy current connection to Site Manager...]
- Enter a name for the profile
- Store the Information by pressing OK
If you start FileZilla again, you can choose one of the stored profiles by clicking on the icon [Site Manager] and then on the profile you want to use to connect to your Dreambox via FTP, press the button Connect.
Set the default path of the Dreambox
One can define the default path which should be displayed when connecting to the Dreambox via FTP. This is helpfull, because OE 2.0 introduced a small change by using the home directory (/home/root) as default path instead of the root directory (/) as before.
- Start FileZilla
- Open Site Manager
- Choose a profile
- Click on register [Advanced]
- Enter the path in entry field [Default remote directory], e.g. /
- Store the Information by pressing OK
You can test the new default path by establishing a new connection to the Dreambox using the stored profile.
Screencast
Please have a look at Episode 2 of Dreamscreencast as well, if you don't mind that this is in german.
 see article: Dreamscreencast (german only)


