GP3 boxfs (en): Unterschied zwischen den Versionen
| Zeile 4: | Zeile 4: | ||
|} | |} | ||
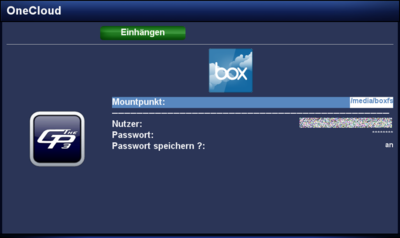
[[Datei:GP3 boxfs.png|right|thumb|400px|boxfs]] | [[Datei:GP3 boxfs.png|right|thumb|400px|boxfs]] | ||
| − | + | With the <code>geminiboxfs</code> Plugin, it's possible to connect with the [http://en.wikipedia.org/wiki/Cloud_computing Cloud] from [https://www.box.com/ box.com]. For a private user the free account offers '''5GB''' capacity. On top this is an OpenSource solution. | |
== Installation == | == Installation == | ||
| − | + | Install the <code>geminiboxfs</code> Plugin via [[GP3 Addons|Addons]] in the Blue Panel. The package is in the category '''Gemini Plugins'''. After installing the plugin an [[Enigma2]] restart or reboot of the Dreambox is required. It's also possible to install the plugin via [[Telnet (en)]] or SSH with the following command. | |
<syntaxhighlight> | <syntaxhighlight> | ||
opkg update && opkg install geminiboxfs | opkg update && opkg install geminiboxfs | ||
| Zeile 41: | Zeile 41: | ||
== Deinstallation == | == Deinstallation == | ||
| − | + | Removing the plugin is done via [[GP3 Addons|Addons]]. In the category '''Gemini Plugins''' select <code>geminiboxfs</code> with the {{Taste|OK}} button and start the deinstallation with the {{Green|green}} button. After installing the plugin an [[Enigma2]] restart or reboot of the Dreambox is required. It's also possible to remove the plugin via [[Telnet (en)]] or SSH: | |
<syntaxhighlight> | <syntaxhighlight> | ||
opkg remove geminiboxfs | opkg remove geminiboxfs | ||
Version vom 26. Dezember 2012, 17:09 Uhr
With the geminiboxfs Plugin, it's possible to connect with the Cloud from box.com. For a private user the free account offers 5GB capacity. On top this is an OpenSource solution.
Inhaltsverzeichnis
Installation
Install the geminiboxfs Plugin via Addons in the Blue Panel. The package is in the category Gemini Plugins. After installing the plugin an Enigma2 restart or reboot of the Dreambox is required. It's also possible to install the plugin via Telnet (en) or SSH with the following command.
opkg update && opkg install geminiboxfs
Bedienung
Benutzt die Beschreibung der folgenden Tabelle, um auf den box.com Account zuzugreifen.
| Eingabe | Beschreibung |
|---|---|
| Mountpunkt: | Unter dem Eingestellten Pfad (Standardmässig /media/boxfs) werden die Daten von box.com bereitgestellt.
|
| Nutzer: | Benutzername des box.com Accounts eingeben. |
| Passwort: | Passwort des box.com Accounts eingeben. |
| Passwort speichern?: | Bei der Auswahl an, wird das Passwort für zukünftige box.com Zugriffe gespeichert. Bei aus muss es jedes mal eingegeben werden, damit mal auf die Cloud zugreifen kann. |
| grüne Taste einhängen | Hängt die box.com Cloud in den eingestellten Mountpukt ein. |
| rote Taste aushängen | Trennt die Verbindung zur Cloud. |
In Verbindung mit dem geminiencfs Plugin, könnt ihr Daten in der Cloud von box.com verschlüsseln.
|
Deinstallation
Removing the plugin is done via Addons. In the category Gemini Plugins select geminiboxfs with the OK button and start the deinstallation with the green button. After installing the plugin an Enigma2 restart or reboot of the Dreambox is required. It's also possible to remove the plugin via Telnet (en) or SSH:
opkg remove geminiboxfs
Zugriff via Terminal
Ihr könnt auch auf Cloud via Telnet oder SSH zugreifen, z.B. für Testzwecke. Beachtet bitte, dass der Mountpunkt im Verzeichnis /media vorhanden sein muss. Der Befehl ist wie folgt:
boxfs -u Nutzer -p Passwort /media/Mountpunkt
Ausgehängt wird die Cloud mit folgendem Befehl:
umount /media/Mountpunkt
