GP3 Settings Automount (en): Unterschied zwischen den Versionen
| Zeile 3: | Zeile 3: | ||
|[[Bild:english.png]] - [[GP3 Settings Automount (en)|in English]] | |[[Bild:english.png]] - [[GP3 Settings Automount (en)|in English]] | ||
|} | |} | ||
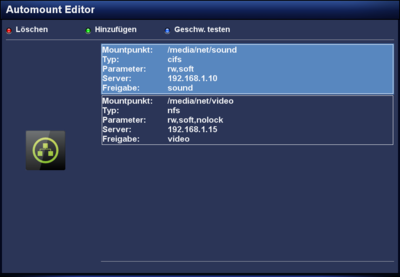
| − | [[Datei:GP3 Automount Editor.png|thumb|right|400px| | + | [[Datei:GP3 Automount Editor.png|thumb|right|400px|Configured NFS and CIFS mounts]] |
| − | + | With the Automount Editor it's possible to mount [http://de.wikipedia.org/wiki/Server_Message_Block SMB] and [http://de.wikipedia.org/wiki/Network_File_System NFS] shares. The mounting is using the <code>[http://www.autofs.org/ autofs]</code> daemon. This daemon mounts the shares automatically, as soon as the configured mount point is opened. Unmounting is also executed automatically, when leaving the directory. Additional info can be found in the article [[Auto Mounter]]. | |
| − | + | Over the created mount point(s) in <code>/media/net</code> the devices can be accessed. | |
| − | + | Also interesting is the [[GP3 Netscan (en)|GP3 Netscan]] plugin, which scans the network for shares and can transfer them to the Automount Editor. | |
| − | + | Over the {{Green|green}} button new mount points can be created. The {{Red|red}} button removes entries from the list. and with the {{Blue|blue}} button a speed test can be executed. But keep in mind the speed test will only work if the device is mounted successfuly. | |
| − | + | After saving the settings and leaving the Automount Editor over the {{Red|EXIT}} button, the <code>autofs</code> daemon is reloaded. The devices can be accessed immediatly, rebooting the Dreambox is not required. | |
== Bedingungen == | == Bedingungen == | ||
Version vom 2. Juli 2013, 20:56 Uhr
With the Automount Editor it's possible to mount SMB and NFS shares. The mounting is using the autofs daemon. This daemon mounts the shares automatically, as soon as the configured mount point is opened. Unmounting is also executed automatically, when leaving the directory. Additional info can be found in the article Auto Mounter.
Over the created mount point(s) in /media/net the devices can be accessed.
Also interesting is the GP3 Netscan plugin, which scans the network for shares and can transfer them to the Automount Editor.
Over the green button new mount points can be created. The red button removes entries from the list. and with the blue button a speed test can be executed. But keep in mind the speed test will only work if the device is mounted successfuly.
After saving the settings and leaving the Automount Editor over the EXIT button, the autofs daemon is reloaded. The devices can be accessed immediatly, rebooting the Dreambox is not required.
Inhaltsverzeichnis
Bedingungen
Das mounten, also einbinden des Zielgerätes (PC, NAS, usw.) funktioniert natürlich nur, wenn die SMB oder NFS Freigaben korrekt erstellt worden sind. Und für die Eingaben im Automount Editor, benötigt ihr im Minimum folgende Informationen. Weitere Einstellungsmöglichkeiten sind in der folgenden Tabelle beschrieben.
- Protokoll (cifs oder nfs). Lest dazu die Betriebsanleitungen der verwendeten Geräte.
- Freigabename oder Freigabepfad für nfs.
- IP Adresse des Zielgerätes. Der Hostname kann auch benutzt werden, wenn die Namensauflösung von der Dreambox funktioniert.
- Benutzername und Passwort bei der Benutzung von cifs.
Einstellungen
Die folgende Tabelle beschreibt die einzelnen Einstellungsmöglichkeiten.
| Einstellung | Beschreibung |
|---|---|
| Name: | Wunschname (Verzeichnis) des zu mountenden Gerätes eingeben. Den Verzeichnisnamen findet ihr später in /media/net, worüber euer Gerät eingebunden wird. Der Name darf kein zweites mal verwendet, sonst ist das mounten nicht möglich!!!
|
| Typ: | Auswahl der Protokolls cifs, oder nfs. Die weiteren Einstellungen sind abhängig von dieser Auswahl. Benutzername und Passwort können z.B. nur bei cifs mounts und nicht bei der Benutzung von nfs benutzt werden. |
| Parameter: | Hier könnt ihr mit der OK verschiedene Optionen ein- oder ausschalten (z.B. Schreib- Lesezugriff, Protokollwahl tcp oder udp). Empfehlenswert sind die Einstellungen rw,soft für cifs und rw,soft,nolock für nfs Zugriffe. Beachtet bitte, dass Server Einstellungen (z.B. wegen Schreibrechten) nicht mit den Optionen umgangen werden können.
|
| Server: | IP Adresse des zu mountenden Gerätes eingeben. |
| Freigabe: | Name der Freigabe (cifs), oder Freigabepfad (nfs) eingeben. |
| Lesepuffer/Schreibpuffer: | Die Optionen bestimmen die Grösse der Datenpakete, welche Client und Server austauschen. Normal müssen keine Veränderungen vorgenommen werden, Server und Client handeln dies automatisch aus. Beachtet bitte, dass falsch eingestellte Werte, die Netzwerk Performance sehr stark reduzieren! |
| Nutzer: | Benutzername eingeben (nur für cifs Verbindungen). |
| Passwort: | Passwort eingeben (nur für cifs Verbindungen). |
| Charset (utf8): | Zeichenkodierung eingeben (utf8) um Probleme mit Umlauten zu vermeiden (nur für cifs Verbindungen). |
Konfigurationsdatei
Der Automount Editor bearbeitet die Datei auto.network, welche im Verzeichnis /etc zu finden ist.
