Manual installation of an addon (tar.gz, tar.bz2, ipk) via FTP: Unterschied zwischen den Versionen
Zur Navigation springen
Zur Suche springen
EgLe (Diskussion | Beiträge) |
Mfgeg (Diskussion | Beiträge) |
||
| Zeile 1: | Zeile 1: | ||
| − | [[ | + | {|width="40%" |
| − | [[ | + | |[[Bild:deutsch.png]] - [[Manuelle Installation eines Addons (tar.gz, tar.bz2, ipk) über FTP|in Deutsch]] |
| − | [[ | + | |[[Bild:english.png]] - [[Manual installation of an addon (tar.gz, tar.bz2, ipk) via FTP|in English]] |
| − | [[ | + | |} |
| − | |||
| − | |||
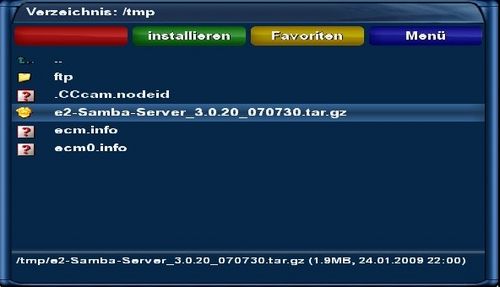
[[Bild:E2_Dateimanager-Gemini_4.60(2).jpg|left|500px]] | [[Bild:E2_Dateimanager-Gemini_4.60(2).jpg|left|500px]] | ||
'''You'll find the file manager with "blue button" then "red button".''' | '''You'll find the file manager with "blue button" then "red button".''' | ||
| Zeile 10: | Zeile 8: | ||
| − | + | [[Kategorie:Instructions (en)]] | |
| − | |||
Aktuelle Version vom 8. September 2013, 11:18 Uhr
.jpg)
You'll find the file manager with "blue button" then "red button". Advice: Copy file via FTP to /tmp, because files located there are deleted on reboot. But file can be selected and installed via file manager in any directory or mounted external device (USB-Stick, CF-card,...).