GP3 Netscan (en): Unterschied zwischen den Versionen
| Zeile 76: | Zeile 76: | ||
{| class="wikitable" border="1" | {| class="wikitable" border="1" | ||
| − | ! width="180"| | + | ! width="180"|Entry |
| − | ! width="700"| | + | ! width="700"|Description |
|- | |- | ||
| '''IP:''' | | '''IP:''' | ||
| − | | IP | + | | IP adress of the remote device. |
|- | |- | ||
| − | | '''Port ( | + | | '''Port (default 23):''' |
| − | | | + | | port number which is used for the telnet server to connect (default port 23). |
|- | |- | ||
| − | | '''Telnet | + | | '''Telnet user:''' |
| − | | | + | | user name, which is used to login onto the telnet server. the user needs the appropriate user rights (root / admin), to shutdown the device! |
|- | |- | ||
| − | | '''Telnet | + | | '''Telnet password:''' |
| − | | | + | | password of the user. |
|- | |- | ||
| '''Befehl:''' | | '''Befehl:''' | ||
Version vom 1. Juli 2013, 22:05 Uhr
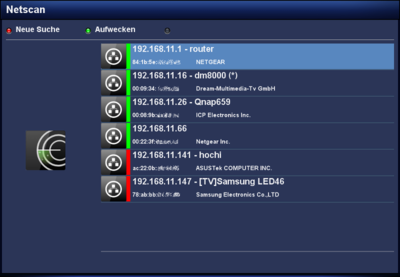
The gemininetscan Plugin scans the local network for available devices. subsequently (depending on the settings) a port scan is performed do discover open Ports. The result is displayed on the TV screen. Following functions are covered by the plugin:
- Scan the local network for available devices (via eth0 or wlan0).
- List the services of the discoverd devices.
- Display the MAC adresses of the devices, including the manufacturer info.
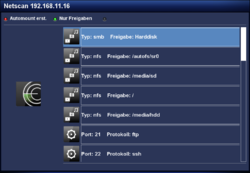
- Scans for available Samba and NFS shares.
- Can transfer the found shares directly to the Automount Editor.
- Supports WOL, to wake up devices.
- Can initiate a shutdown or reboot, if a Telnet server is installed on the device.
- Displays active / inactive devices (
 = online /
  = offline).
Inhaltsverzeichnis
Installation
Install the gemininetscan Plugin via Addons in the Blue Panel. The package is in the category Gemini Plugins. After installing the plugin an Enigma2 restart or reboot of the Dreambox is required. It's also possible to install the plugin via Telnet (en) or SSH with the following command.
opkg update && opkg install gemininetscan
Operation
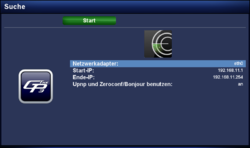
After starting the plugin, you can open the settings with the red button. The following table lists the different options. The scan can be startet with the Start button. Once the scan of the network is completed, a list of availiable devices is displayed. Including the informations concerning the services, MAC adresses, .... An additional scan can be started at any moment over the red button.
Settings
| Entry | Description |
|---|---|
| Network interface: | selection of the network interface e.g. eth0 or wlan0, which will be used for the scan (if multiple interfaces are available). |
| Start: / End: | range od IP addresses for the scan. |
| Search the Ports: | here you can define which ports will be scanned. Following options are possible:
|
| Scan own IP?: | here you can indicate if your own Dreambox needs to be scanned, or not ;) |
| Don't display devices without services: | devices without services can be displayed or hidden with this setting. |
| users with a Fritzbox from AVM, should not scan the port range 1-49151 or 1-65535. |
To see the the shares, select a device from the list and push the OK button. It's also possible to filter the list over the green button, to see only the NFS and SMB shares. Keep in mind, the WinXP shares will not be displayed, only the pure NFS and Samba Server shares.
Mounting a NFS or SMB share is easy. Select the share and push the red button. The share will be transfered to the Automount Editor. Modify the settings and the device can be reached over /media/net/mountpoint.
Wake up
Wake up of devices is performed in the list with the green button. Keep in mind, the devices should support WOL and the function needs to be activated. Please read the manual of your used devices. To wake up devices, the /usr/bin/ether-wake command of Busybox is used.
Shutdown / Reboot
For this function, a telnet server needs to be installed on the device (e.g. Dreambox, PC, NAS, ...). The gemininetscan Plugin performs a login with user name and password via Telnet on the remote device and executes the command for the shutdown / reboot. The following articles explain how to install a telnet server on Ubuntu (Linux), Mac OS, or Windows.
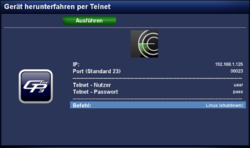
The shutdown (or reboot) is initiated over the blue button, where the required informations e.g. port, user name, password, ... needs to be entered. Push the green button, to shutdown the device. The following table explains the required informations.
| Entry | Description |
|---|---|
| IP: | IP adress of the remote device. |
| Port (default 23): | port number which is used for the telnet server to connect (default port 23). |
| Telnet user: | user name, which is used to login onto the telnet server. the user needs the appropriate user rights (root / admin), to shutdown the device! |
| Telnet password: | password of the user. |
| Befehl: | Auswahl des Befehls für den Neustart oder das Herunterfahren. Unterschieden werden die Befehle für Linux basierende Geräte, Mac OS und Windows. Am besten testet ihr die Befehle, nachdem ihr euch mit dem Benutzer / Passwort am Telnet Server angemeldet habt. So könnt ihr die Rechte und den Befehl für das Herunterfahren überprüfen. Die folgende Liste, zeigt die vom gemininetscan bereitgestellten Befehle für den Neustart und das Herunterfahren.
Zusätzlich gibt es für Linux die Auswahl mit |
Configuration file
The informations of the scanned network is stored in the JSON file netscan.json in the Gemini Cache.
Scan via Terminal
It's also possible to scan the network via Telnet (en) or SSH, e.g. for testing purposes. Use your IP range, the used interface (e.g. eth0, wlan0, br0, ...). The command is:
gnetscan -d eth0 -f 192.168.1.1 -l 192.168.1.254 -o '/home/root/.geminicache/netscan.json'
Deinstallation
Removing the plugin is done via Addons. In the category Gemini Plugins select gemininetscan with the OK button and start the deinstallation with the green button. After installing the plugin an Enigma2 restart or reboot of the Dreambox is required. It's also possible to remove the plugin via Telnet (en) or SSH:
opkg remove gemininetscan
