GP3 Netscan (en): Unterschied zwischen den Versionen
Mfgeg (Diskussion | Beiträge) |
|||
| (40 dazwischenliegende Versionen von 2 Benutzern werden nicht angezeigt) | |||
| Zeile 4: | Zeile 4: | ||
|} | |} | ||
[[Datei:GP3-Netscan2.png|thumb|right|400px|Overview of the found devices]] | [[Datei:GP3-Netscan2.png|thumb|right|400px|Overview of the found devices]] | ||
| − | The <code>gemininetscan</code> Plugin scans the local network for available devices. | + | The <code>'''gemininetscan'''</code> Plugin scans the local network for available devices with <code>[http://fping.sourceforge.net/ fping]</code>. Subsequently a port scan can be performed to discover shares (with [https://www.thc.org/thc-amap/ amap]) or open [http://en.wikipedia.org/wiki/Port_%28computer_networking%29 Ports]. The result is displayed on the TV screen. Following functions are covered by the plugin: |
* Scan the local network for available devices (via eth0 or wlan0). | * Scan the local network for available devices (via eth0 or wlan0). | ||
| − | * | + | * Executes a port scan for the discovered devices. |
| − | * Display the [http://en.wikipedia.org/wiki/MAC_address MAC | + | * Display the [http://en.wikipedia.org/wiki/MAC_address MAC addresses] of the devices, including the [http://en.wikipedia.org/wiki/Organizationally_Unique_Identifier manufacturer info]. |
| − | * Scans for available [[Samba Server (en)|Samba]] and | + | * Scans for available [[Samba Server (en)|Samba]], NFS and [[FTP (en)|FTP]]shares. |
* Can transfer the found shares directly to the [[GP3 Settings Automount (en)|Automount Editor]]. | * Can transfer the found shares directly to the [[GP3 Settings Automount (en)|Automount Editor]]. | ||
* Supports [http://en.wikipedia.org/wiki/Wake-on-LAN WOL], to wake up devices. | * Supports [http://en.wikipedia.org/wiki/Wake-on-LAN WOL], to wake up devices. | ||
| − | + | * Displays active / inactive devices ([[Datei:state_green.png|text-center]] = online / [[Datei:state_red.png|text-center]] = offline). | |
| − | * Displays active / inactive devices ([[Datei: | ||
| − | == Installation == | + | == Installation / Deinstallation == |
| − | + | The <code>gemininetscan</code> plugin can be installed / removed in different ways: | |
| − | + | {{Hauptbeitrag (en)|GP3 Addons (en){{!}}GP3 Addons| - Category: Gemini Plugins}} | |
| − | + | {{Hauptbeitrag (en)|WebAdmin (en){{!}}WebAdmin| - Package name: <code>gemininetscan</code>}} | |
| − | + | {{Hauptbeitrag (en)|APT (en){{!}}APT| - Package name: <code>gemininetscan</code>}} | |
| + | {{Hauptbeitrag (en)|OPKG (en){{!}}OPKG| - Package name: <code>gemininetscan</code>}} | ||
| + | Restart [[Enigma2 (en)|Enigma2]] after the installation, or reboot the Dreambox. | ||
== Operation == | == Operation == | ||
| − | [[Datei:GP3-Netscan1.png|thumb|right|250px| | + | [[Datei:GP3-Netscan1.png|thumb|right|250px|Search]] |
| − | [[Datei:GP3-Netscan2.png|thumb|right|250px|Completed | + | [[Datei:GP3-Netscan2.png|thumb|right|250px|Completed search]] |
| − | After starting the plugin, you can open the settings with the {{Red|red}} button. The following table lists the different options. The scan can be | + | After starting the plugin, you can open the settings with the {{Red|red}} button. The following table lists the different options. The scan can be started with the {{Green|Start}} button. Once the scan of the network is completed, a list of available devices is displayed. Including the informations concerning the manufacturer, MAC addresses, .... An additional scan can be started at any moment over the {{Red|red}} button. |
| − | |||
{| class="wikitable" border="1" | {| class="wikitable" border="1" | ||
| − | ! width=" | + | ! width="250"|Entry |
! width="700"|Description | ! width="700"|Description | ||
|- | |- | ||
| '''Network interface:''' | | '''Network interface:''' | ||
| − | | | + | | Selection of the network interface e.g. eth0 or wlan0, which will be used for the scan (if multiple interfaces are available). |
|- | |- | ||
| − | | '''Start: / End:''' | + | | '''Start IP: / End IP:''' |
| − | | | + | | Range or IP addresses for the scan. |
|- | |- | ||
| − | | ''' | + | | '''Use Upnp and Zerokonf/Bonjour:''' |
| − | | | + | | If the setting is {{Taste|on}}, the devices are searched via Upnp/Avahi. Use {{Taste|off}} if the search initiates a router crash (e.g. Fritzbox). In this case the search is performed via DNS functions ([http://de.wikipedia.org/wiki/Nslookup nslookup]) and Samba. |
| − | |||
| − | |||
| − | |||
| − | |||
| − | |||
| − | |||
| − | |||
| − | |||
| − | |||
| − | |||
| − | |||
| − | |||
|} | |} | ||
| − | + | ==== Start portscan ==== | |
| − | + | [[Datei:Netscan Portscan.png|thumb|right|250px|Settings Portscan]] | |
| − | ==== | + | A portscan for the found devices can be executed. Select the wanted device with the {{Taste|OK}} button. In the following window, it is possible to perform a scan for the device with the following settings (see below). Use the navigation buttons {{Taste|◀}} {{Taste|▶}}, to change the settings. |
| − | [[Datei: | ||
| − | |||
| − | |||
| − | |||
| − | |||
| − | |||
| − | |||
| − | |||
| − | |||
| − | |||
| − | |||
| − | |||
| − | |||
| − | |||
| − | |||
| − | |||
| − | |||
| − | |||
{| class="wikitable" border="1" | {| class="wikitable" border="1" | ||
| − | ! width=" | + | ! width="250"|Setting |
| − | ! width="700"| | + | ! width="700"|Description |
|- | |- | ||
| − | | ''' | + | | '''Shares (NFS, SMB, FTP):''' |
| − | | | + | | Search only for NFS, SMB and FTP shares. Keep in mind, SMB shares from Windows XP upwards are not displayed. |
|- | |- | ||
| − | | ''' | + | | '''Standard:''' |
| − | | | + | | Search for available services and shares |
|- | |- | ||
| − | | ''' | + | | '''1-1023:''' |
| − | | | + | | Search for standard ports ([http://en.wikipedia.org/wiki/List_of_TCP_and_UDP_port_numbers#Well-known_ports well known ports]). |
|- | |- | ||
| − | | ''' | + | | '''1-49151:''' |
| − | | | + | | Search for standard ports and [http://en.wikipedia.org/wiki/List_of_TCP_and_UDP_port_numbers#Registered_ports registered] ports. |
|- | |- | ||
| − | | ''' | + | | '''1-65535:''' |
| − | | | + | | Scan complete port range (standard, registered and dynamic). |
| − | |||
| − | |||
| − | |||
| − | |||
| − | |||
| − | |||
| − | |||
| − | |||
| − | |||
|} | |} | ||
| − | == | + | After the selection is made, the portscan can be started with {{Green|Save}}, or the {{Taste|OK}} button. After the search is finished, the found info (services, shares) are displayed on the screen. |
| − | + | ||
| + | ==== Shares ==== | ||
| + | [[Datei:GP3-Netscan3.png|thumb|right|250px|Shares]] | ||
| + | After the portscan is completed, the found SMB or NFS shares are identified with the text '''Share:'''. It's possible to use a filter with the {{Green|green}} button (only shares). This will only display the found NFS and SMB shares. Use the {{Green|green}} button (show all) again, to see all informations. | ||
| + | |||
| + | Keep in mind, the WinXP shares will not be displayed, only the pure NFS and [[Samba Server (en)|Samba Server]] shares. | ||
| + | |||
| + | Mounting a NFS or SMB share is easy. Select the share and push the {{Red|red}} button. The share will be transfered to the [[GP3 Settings Automount (en)|Automount Editor]]. Modify the settings and the device can be reached over <code>/media/net/mountpoint</code>. | ||
| + | |||
| + | ==== Wake up ==== | ||
| + | [[Datei:GP3-Netscan5.png|thumb|right|250px|Wake up]] | ||
| + | Wake up of devices is performed in the list with the {{Green|green}} button. Keep in mind, the devices should support [http://en.wikipedia.org/wiki/Wake-on-LAN WOL] and the function needs to be activated. Please read the [http://en.wikipedia.org/wiki/User_guide manual] of your used devices. To wake up devices, the <code>/usr/bin/ether-wake</code> command of [[BusyBox (en)|BusyBox]] is used. | ||
| − | == | + | == Configuration file == |
| − | + | The informations of the scanned network is stored in the [http://en.wikipedia.org/wiki/JSON JSON] file <code>gnetscan.json</code> in the [[GP3 general settings (en)#Path for Gemini-Cache|Gemini Cache]]. | |
| − | < | ||
| − | gnetscan | ||
| − | </ | ||
| − | == | + | == Scan via Terminal == |
| − | + | It's also possible to scan the network via [[Telnet (en)]] or SSH, e.g. for testing purposes. Use your IP range, the used interface (e.g. eth0, wlan0, br0, ...). The command is: | |
<syntaxhighlight> | <syntaxhighlight> | ||
| − | + | gnetscan -d eth0 -f 192.168.1.1 -l 192.168.1.254 -o '/home/root/.geminicache/gnetscan.json' | |
</syntaxhighlight> | </syntaxhighlight> | ||
| − | [[Kategorie:GP3]] | + | [[Kategorie:GP3 (en)]] |
Aktuelle Version vom 4. September 2016, 19:36 Uhr
The gemininetscan Plugin scans the local network for available devices with fping. Subsequently a port scan can be performed to discover shares (with amap) or open Ports. The result is displayed on the TV screen. Following functions are covered by the plugin:
- Scan the local network for available devices (via eth0 or wlan0).
- Executes a port scan for the discovered devices.
- Display the MAC addresses of the devices, including the manufacturer info.
- Scans for available Samba, NFS and FTPshares.
- Can transfer the found shares directly to the Automount Editor.
- Supports WOL, to wake up devices.
- Displays active / inactive devices (
 = online /
  = offline).
Inhaltsverzeichnis
Installation / Deinstallation
The gemininetscan plugin can be installed / removed in different ways:
 see article: GP3 Addons - Category: Gemini Plugins
 see article: WebAdmin - Package name:
 gemininetscan see article: APT - Package name:
 gemininetscan see article: OPKG - Package name:
 gemininetscan
Restart Enigma2 after the installation, or reboot the Dreambox.
Operation
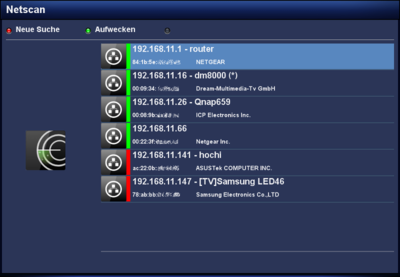
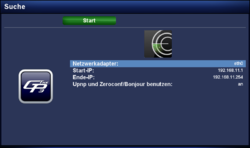
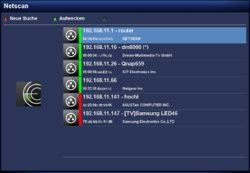
After starting the plugin, you can open the settings with the red button. The following table lists the different options. The scan can be started with the Start button. Once the scan of the network is completed, a list of available devices is displayed. Including the informations concerning the manufacturer, MAC addresses, .... An additional scan can be started at any moment over the red button.
| Entry | Description |
|---|---|
| Network interface: | Selection of the network interface e.g. eth0 or wlan0, which will be used for the scan (if multiple interfaces are available). |
| Start IP: / End IP: | Range or IP addresses for the scan. |
| Use Upnp and Zerokonf/Bonjour: | If the setting is on, the devices are searched via Upnp/Avahi. Use off if the search initiates a router crash (e.g. Fritzbox). In this case the search is performed via DNS functions (nslookup) and Samba. |
Start portscan
A portscan for the found devices can be executed. Select the wanted device with the OK button. In the following window, it is possible to perform a scan for the device with the following settings (see below). Use the navigation buttons ◀ ▶, to change the settings.
| Setting | Description |
|---|---|
| Shares (NFS, SMB, FTP): | Search only for NFS, SMB and FTP shares. Keep in mind, SMB shares from Windows XP upwards are not displayed. |
| Standard: | Search for available services and shares |
| 1-1023: | Search for standard ports (well known ports). |
| 1-49151: | Search for standard ports and registered ports. |
| 1-65535: | Scan complete port range (standard, registered and dynamic). |
After the selection is made, the portscan can be started with Save, or the OK button. After the search is finished, the found info (services, shares) are displayed on the screen.
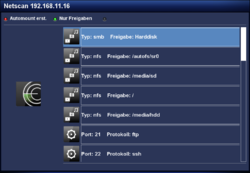
After the portscan is completed, the found SMB or NFS shares are identified with the text Share:. It's possible to use a filter with the green button (only shares). This will only display the found NFS and SMB shares. Use the green button (show all) again, to see all informations.
Keep in mind, the WinXP shares will not be displayed, only the pure NFS and Samba Server shares.
Mounting a NFS or SMB share is easy. Select the share and push the red button. The share will be transfered to the Automount Editor. Modify the settings and the device can be reached over /media/net/mountpoint.
Wake up
Wake up of devices is performed in the list with the green button. Keep in mind, the devices should support WOL and the function needs to be activated. Please read the manual of your used devices. To wake up devices, the /usr/bin/ether-wake command of BusyBox is used.
Configuration file
The informations of the scanned network is stored in the JSON file gnetscan.json in the Gemini Cache.
Scan via Terminal
It's also possible to scan the network via Telnet (en) or SSH, e.g. for testing purposes. Use your IP range, the used interface (e.g. eth0, wlan0, br0, ...). The command is:
gnetscan -d eth0 -f 192.168.1.1 -l 192.168.1.254 -o '/home/root/.geminicache/gnetscan.json'


